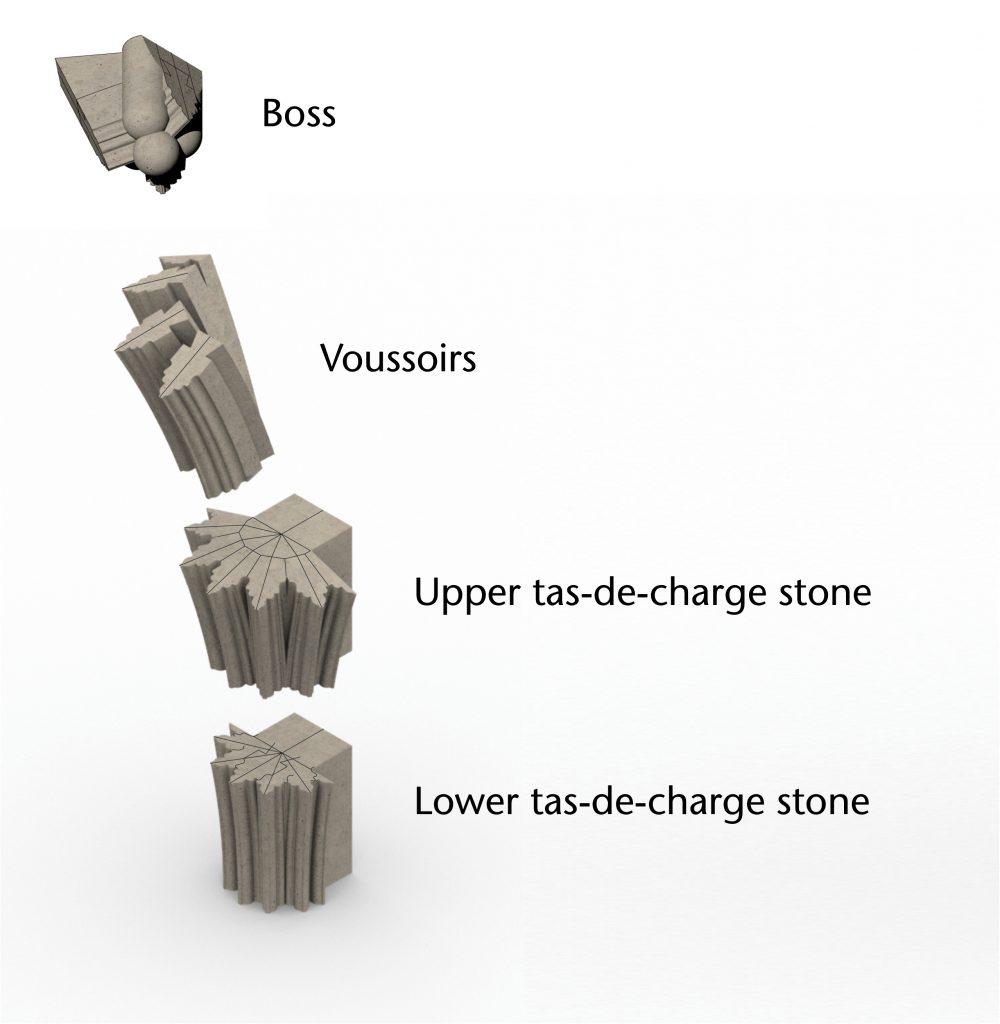
Stonecutting is a collective term for the practical processes through which the stone components of a vault were cut to shape by medieval masons. Each individual rib within a vault is divided into a series of curved sections called voussoirs. The base of a rib usually consists of larger tas-de-charge stones, which combine the curvatures of multiple intersecting ribs within a single block. Similarly, the apex is defined using a boss or keystone, providing a point of convergence for the rising arcs of several ribs. However, it is difficult to study how these highly complex stones were set out by medieval masons. If the vault is still standing, it is not possible to examine the concealed faces of the stones, and even where they are visible the incised markings of the setting out process are often destroyed by the stonecutting itself.
Whilst it is not therefore possible to analyse the geometry of the individual stones within our case studies directly, it is possible to study them using parametric modelling. By producing 3D models for individual stone blocks, we can test whether or not our hypotheses regarding their setting out process are possible in practice, as well as identify many of the problems which would have been encountered by the masons in realising their designs. By comparing the resulting models directly to our scanned data, we can therefore assess what kinds of techniques could have been used for planning and cutting the blocks in medieval vaulting.
Working with stone
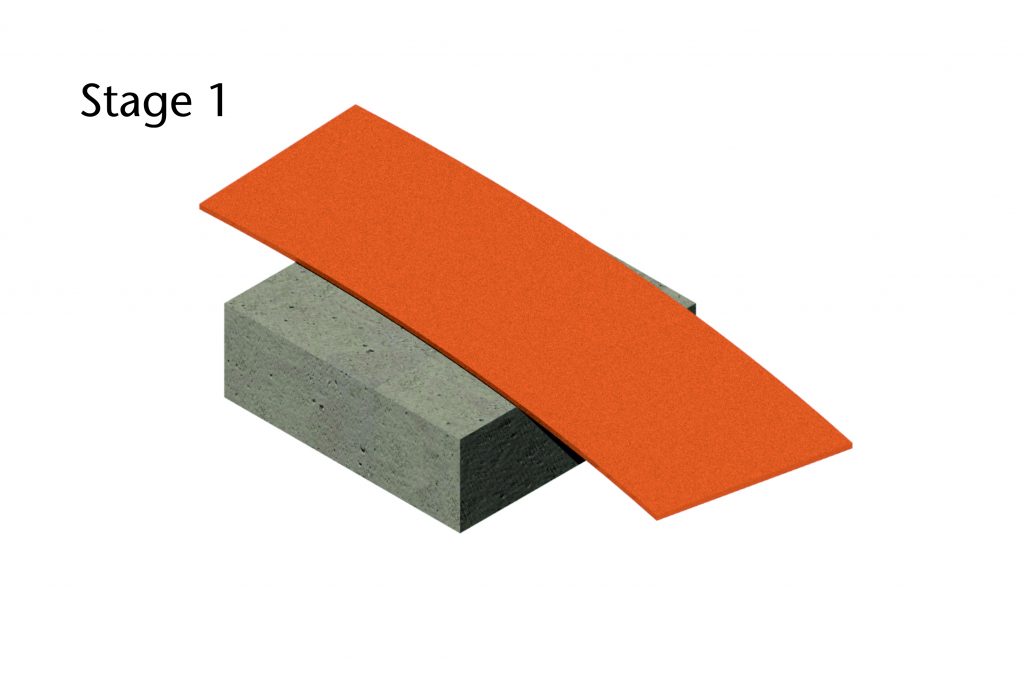
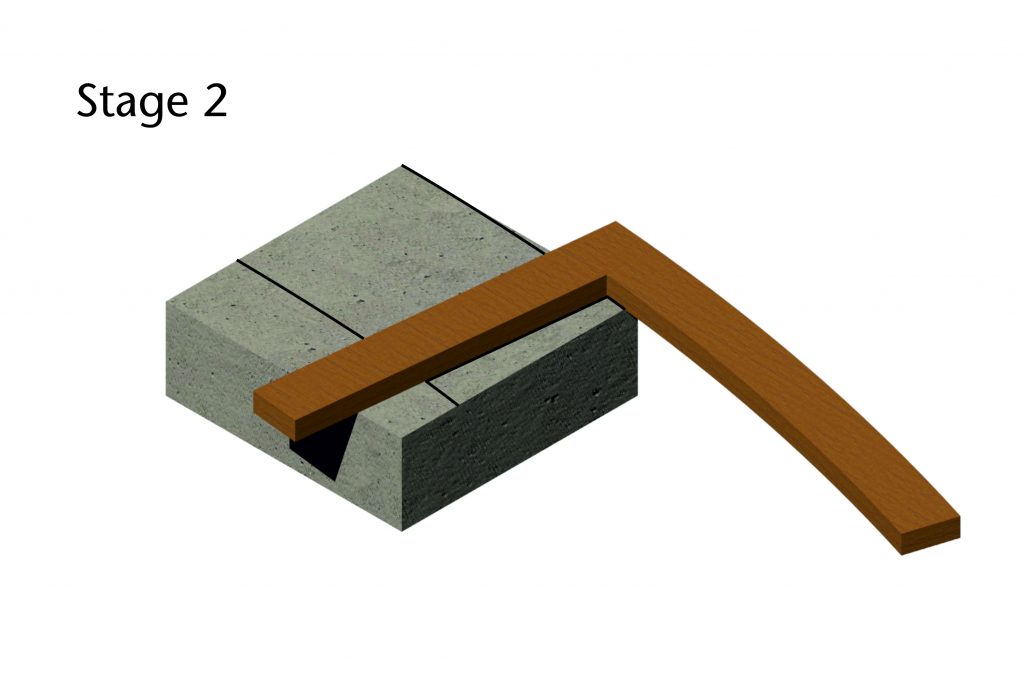
Stonecutting consisted of a series of simple steps conducted by a team of masons, working both on site and at the quarry. The form of each individual stone was realised iteratively, with the carving process being conducted as a series of increasing levels of detail. The process of cutting these stones was a series of simple steps through which the form of the block was gradually refined. The first stage was to extract stone from the quarry and ‘scapple’ or hew it into roughly square blocks. Wooden templates would then be used to transfer the curvature and profiles of the designs directly onto the surface of the blocks, using a series of incised construction lines. With the design in place, the process of rough carving would begin, establishing the general shape of the block and its moulding. Once this was completed, the stone would be ‘dressed’, with the details of the mouldings, sculpture and other fine carving being cut into its surface. The process involved a high degree of artistic independence on the part of the mason, relying on the ad hoc application of practical skills rather than the detailed blueprints or precise calculations of modern stereotomy.
Medieval masons used a variety of different tools to cut their stones. Axes, points and chisels would be used for the rough and fine carving, with drills occasionally being employed for undercutting (especially in sculpture). Designs would be imposed on the surface of the block using a series of incised lines. These would be drawn with the aid of straight edges, squares and a set of wooden templates. The templates consisted of two main types, each providing a different set of two-dimensional geometry for the stones. Moldes or formes were used to give the shape of the rib’s moulding – the undulating profile which was projected along its intrados line. Bevels were used to convey the rib’s curvature, consisting of a modified mason’s square with a curved edge. Templates and squares would also be used to check whether or not the stones had been cut correctly, offered up against the surface of the stone to test the angles of their faces or the shape of their profiles.
Whilst many different types of stone were used in medieval vaulting, the most common for ribs and bosses was finely grained limestone. This usually provided the best balance of properties for medieval stonework, being hard enough to hold its shape yet soft enough to support fine carving without compromising the durability of the masonry. Sometimes stones were cut to shape at the quarry, but more commonly they would be transported to the worksite as square blocks. Stones would come in many different shapes and sizes, allowing masons to cut a variety of component parts from voussoirs to tas-de-charge stones.
Voussoirs
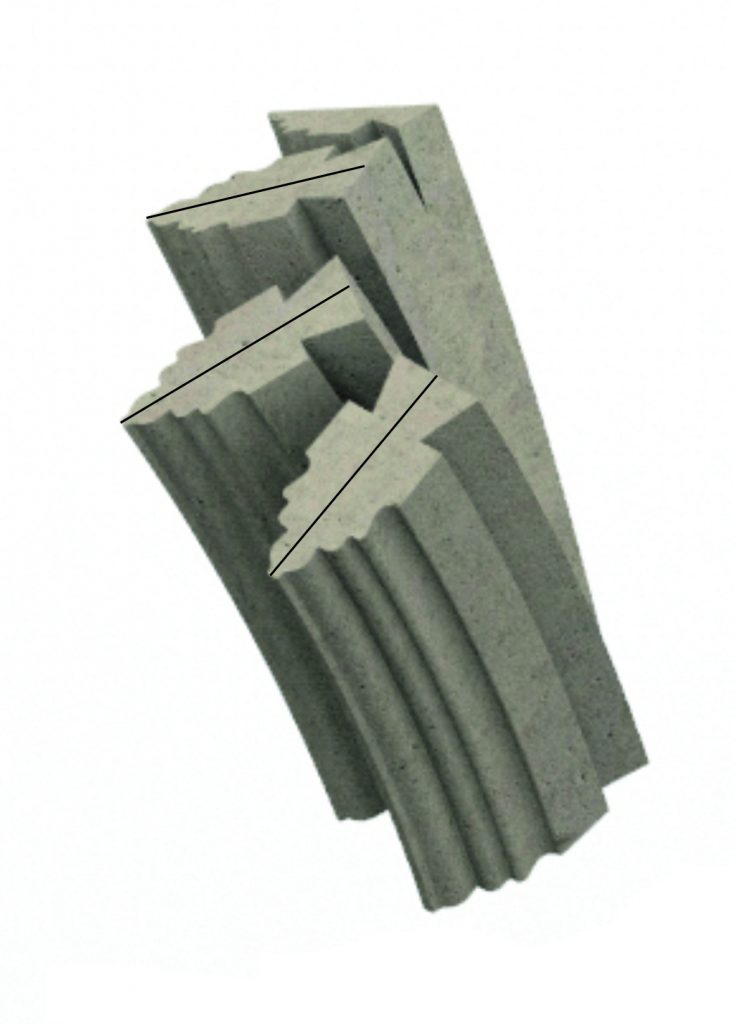
Each rib is divided up into a series of stone segments called voussoirs. These consist of curved sections of stone extending between two flat faces or joints, shaped according to a continuous moulding profile which follows the curvature of the intrados. The extrados is often marked by a stalk, providing a surface against which the stones of the webbing can be laid.
It is not entirely clear how templates were used to transfer forms onto the stones themselves. The general shape of the voussoirs would presumably have been established using a bevel, which could be laid against the lateral faces of the block and used as a stencil for tracing out the curvature and the angle of the joints. Axes, chisels and points would then be used to rough out the voussoir, setting out the curves and the joints. Once the basic form had been established, moldes would then be used to set out the rib’s profile at either end of the voussoir. Whilst it was possible that this was accomplished using a stencil method, it is more likely that many details of the design were transferred geometrically. Compasses, squares, straight edges and other measuring tools could have been used to reproduce the geometry of the moulding, a process which is implied by the construction lines which are occasionally visible on the exposed surfaces of displaced stones.
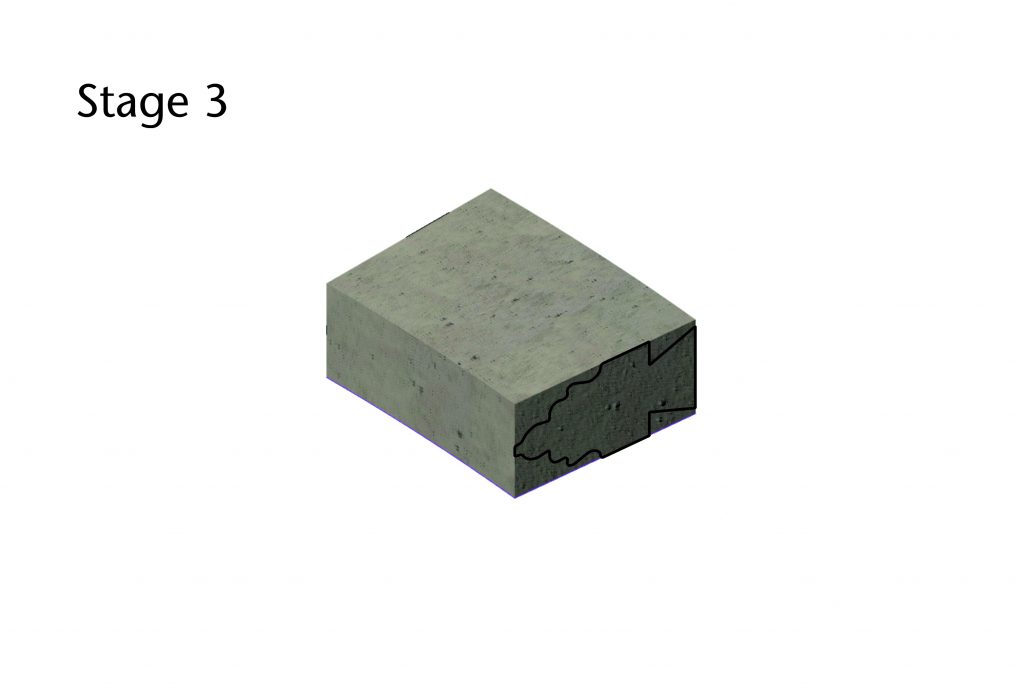

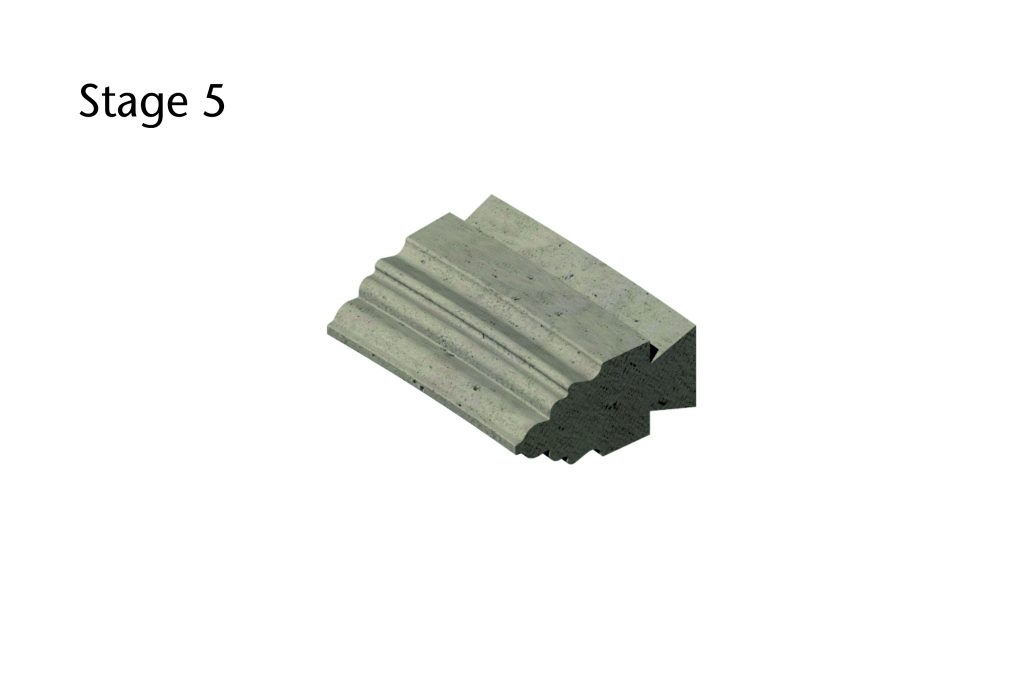
Once the incised outlines of the moulding were in place, the masons could then begin cutting the stones to match. The initial stage was to remove the excess stone surrounding the profile, cutting right up to the protruding edges of the design. There are several surviving examples in which the carving did not progress beyond this stage, providing rare glimpses into the sequential processes behind medieval carving.
The next step would be to carve the fine details of the moulding, offering up the bevel and molde to check that it remained true to form. When one voussoir was completed, the mason would move on to the next, continuing until all of the stones for each rib were completed.
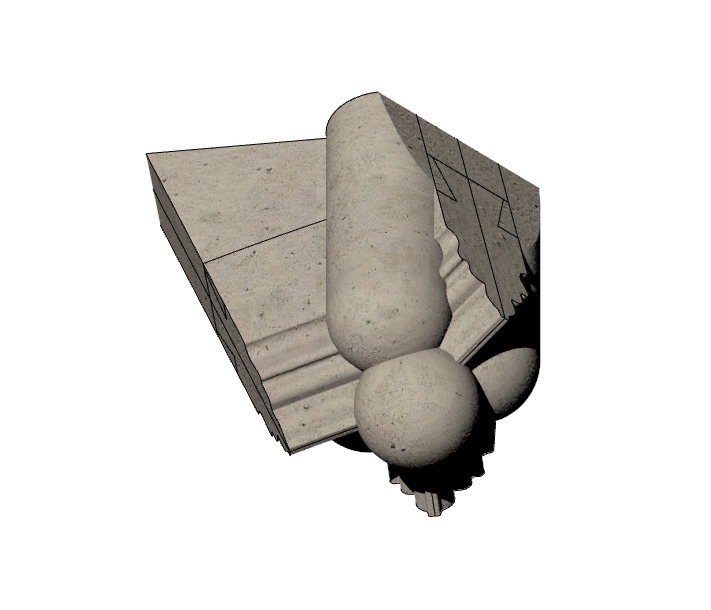
Tas-de-charges
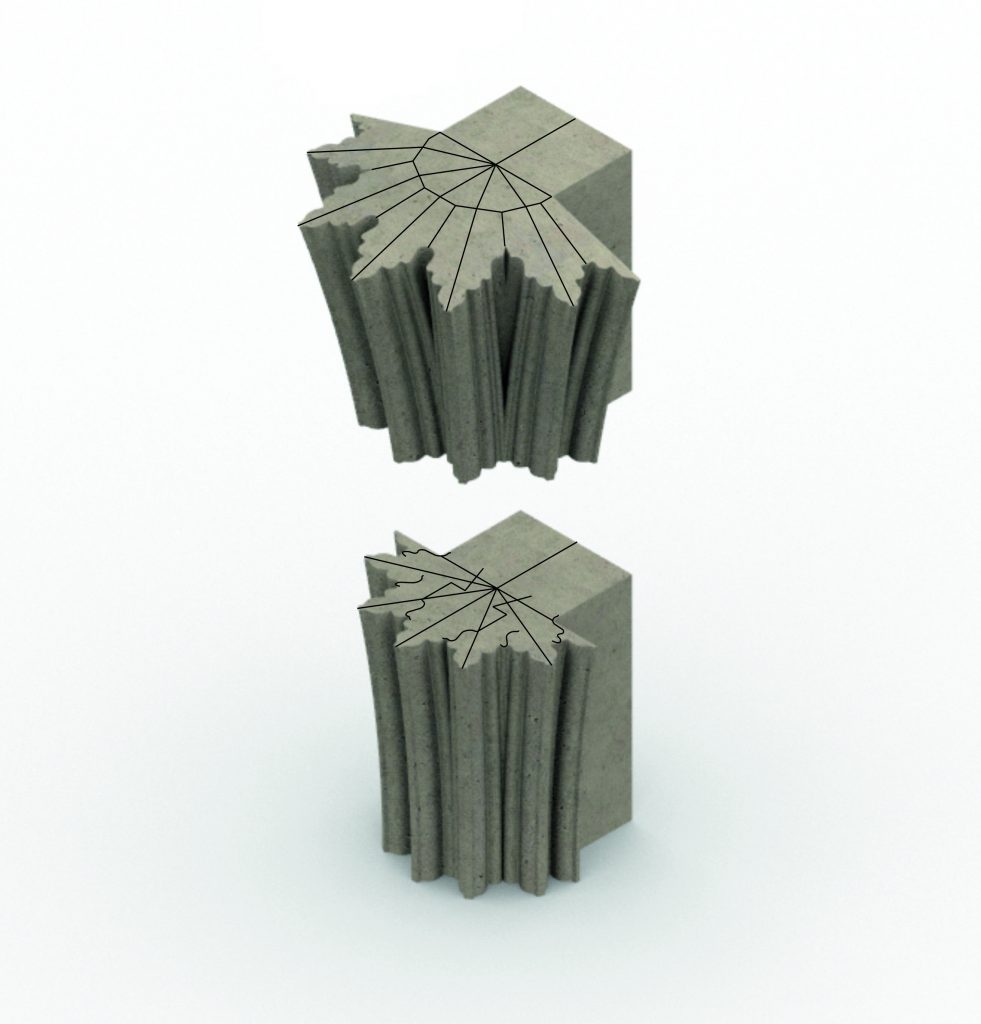
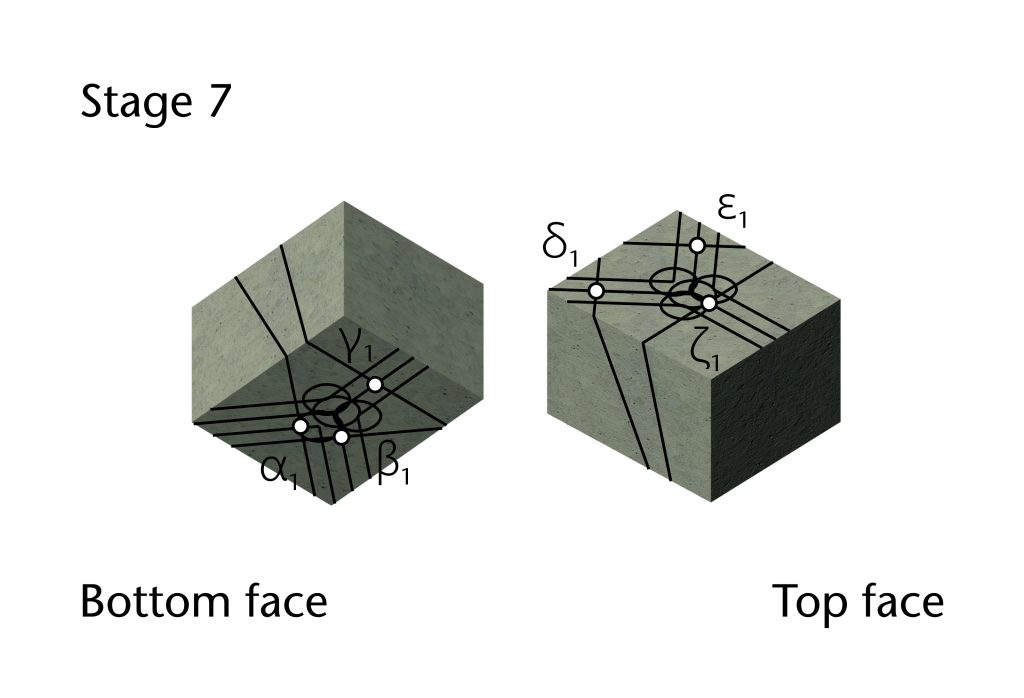
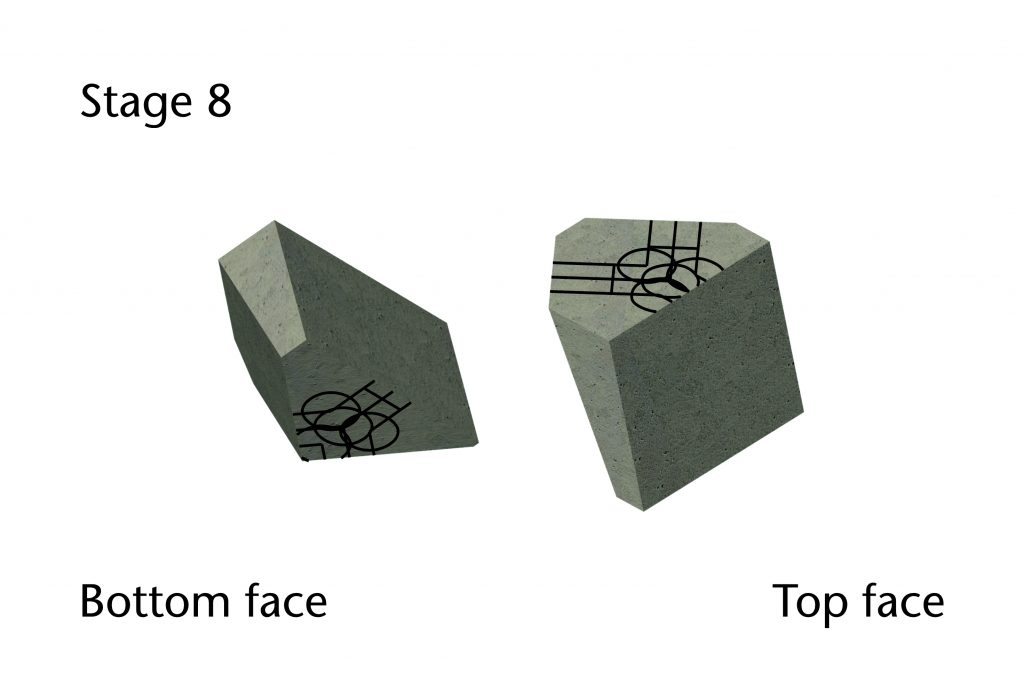
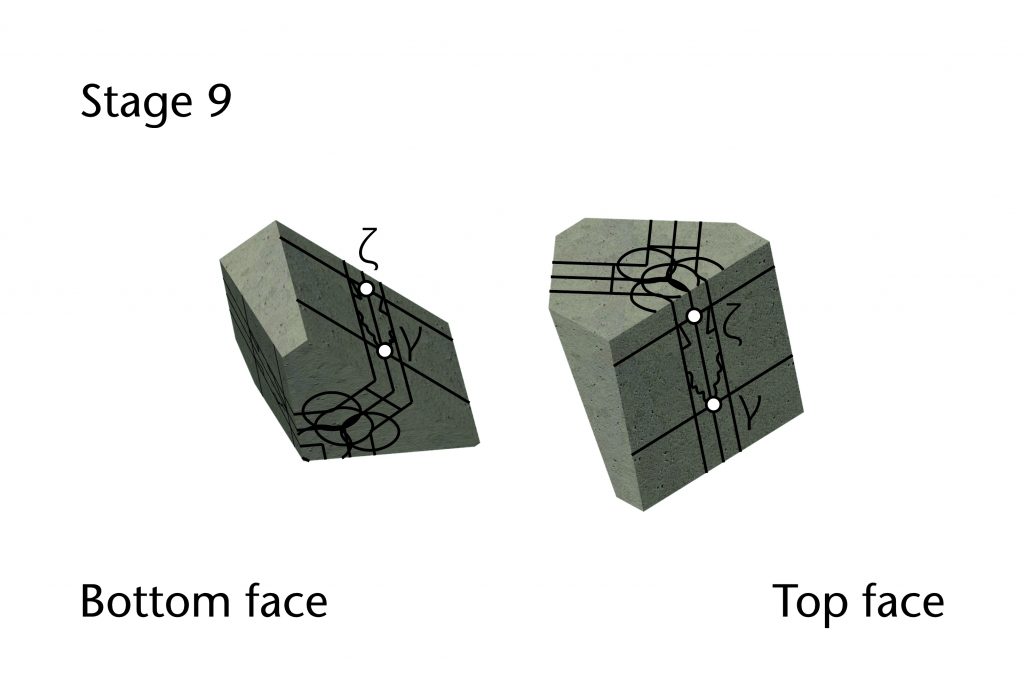
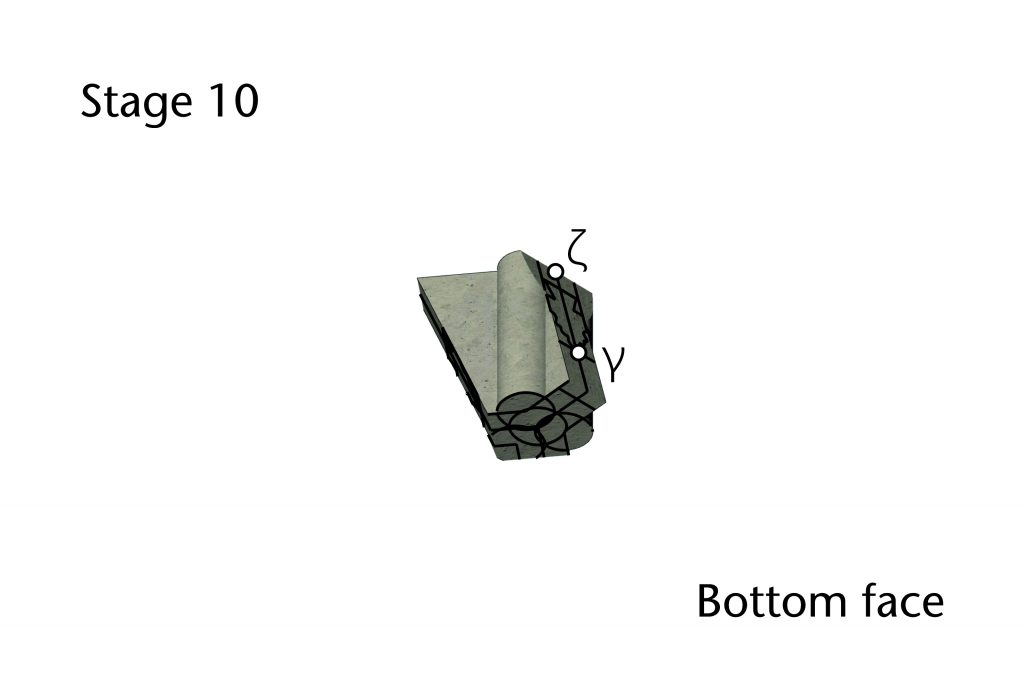
A more complex problem was presented by the tas-de-charges or springers of the vault. At this level the converging forms of the ribs often interpenetrate, resulting in a composite moulding with several rib profiles intersecting at different angles. Rather than keeping these ribs separate, by the early thirteenth century masons had begun to cut the lowest courses of the ribs as single compound blocks. This ‘tas-de-charge’ approach required a more complex set of geometrical methods for setting out the stones, varying considerably from site to site and even vault to vault.
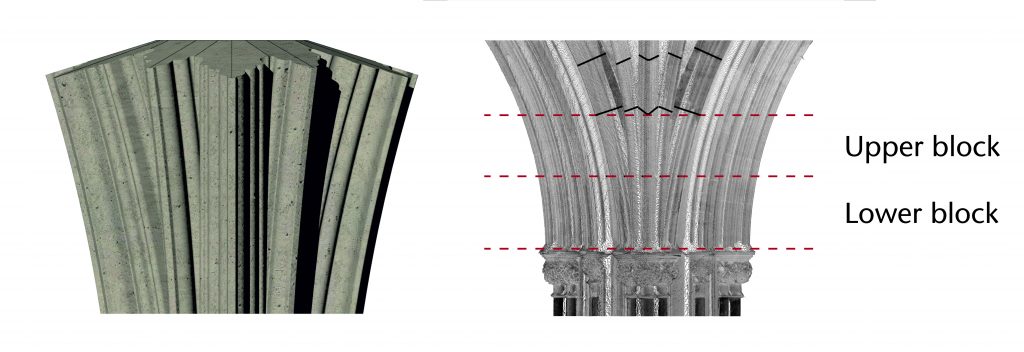
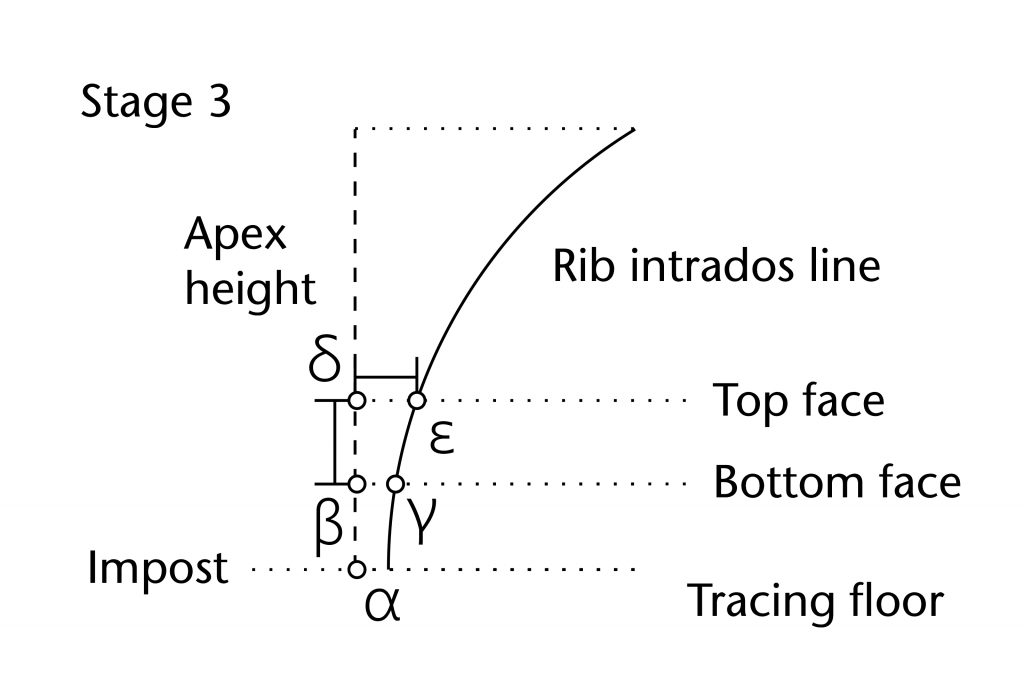
The process of setting out a tas-de-charge can be demonstrated using the example of the south choir aisle at Wells cathedral. At the intersection between bays S7 and S8, the tas-de-charge is divided into two blocks by a horizontal cut around the midpoint of its height. Whereas the lower block is therefore located between two horizontal lines, the upper terminates with radial cuts marking the points where the individual ribs begin to diverge.
The lower block was probably set out using some variation of the following process:
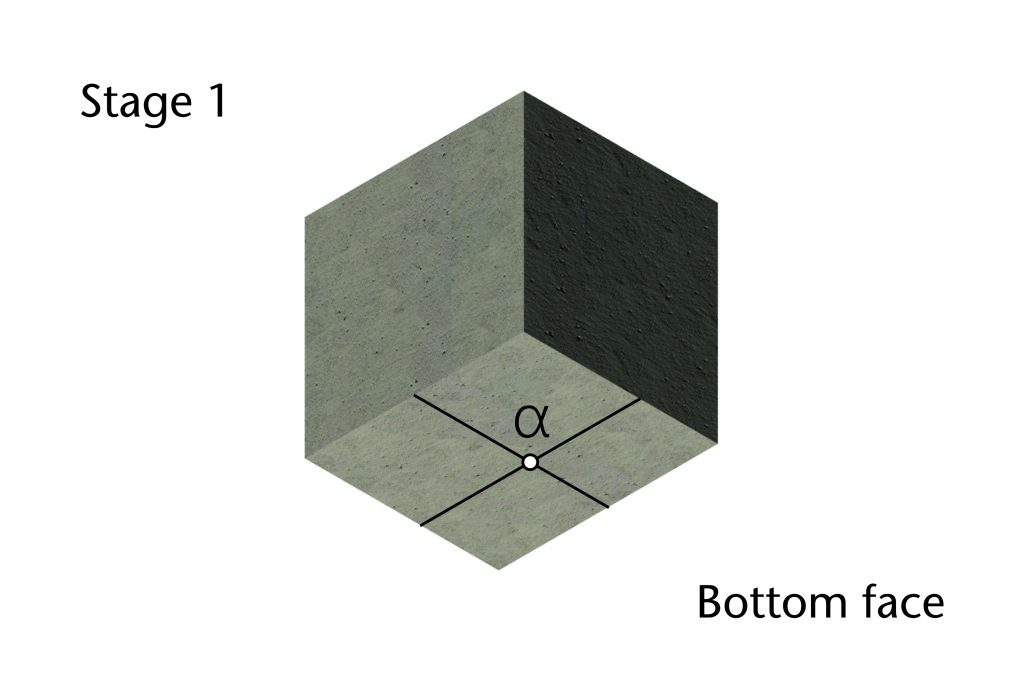
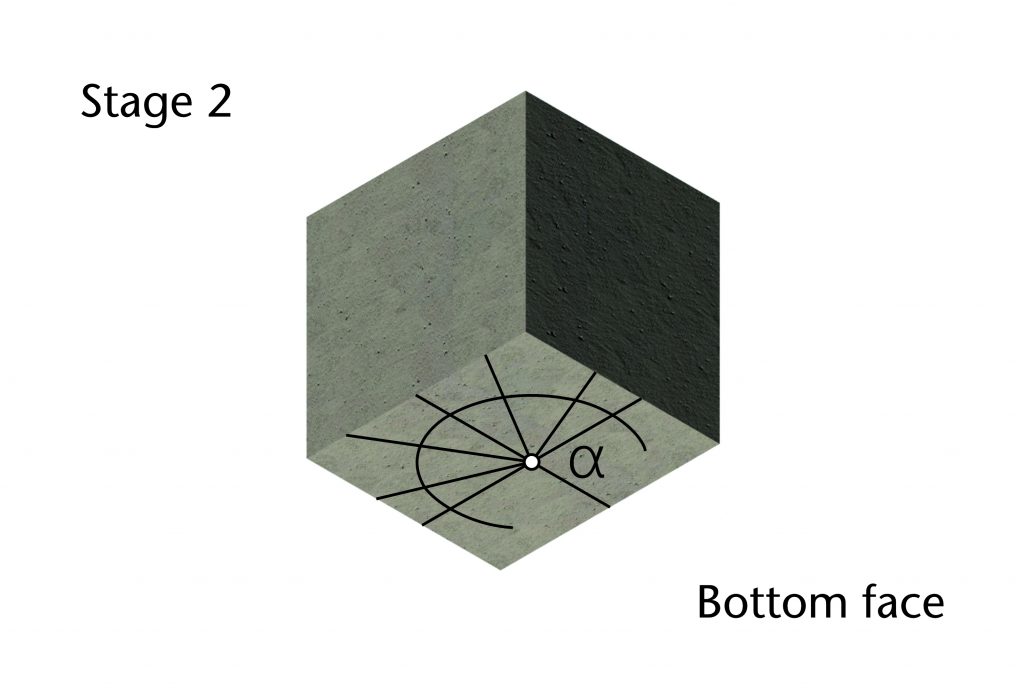
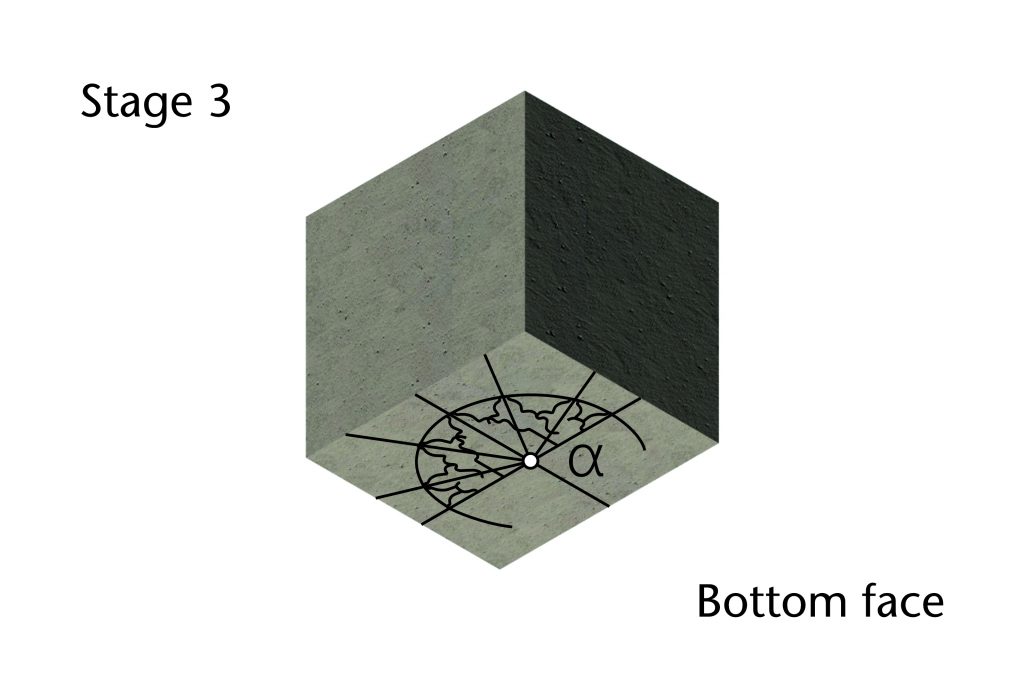
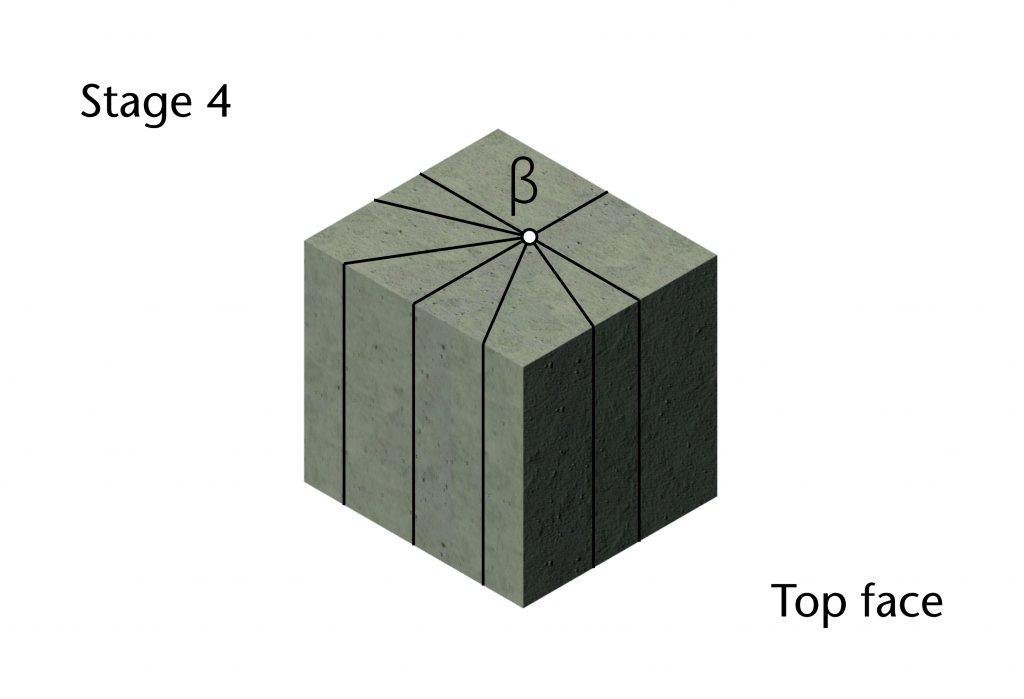
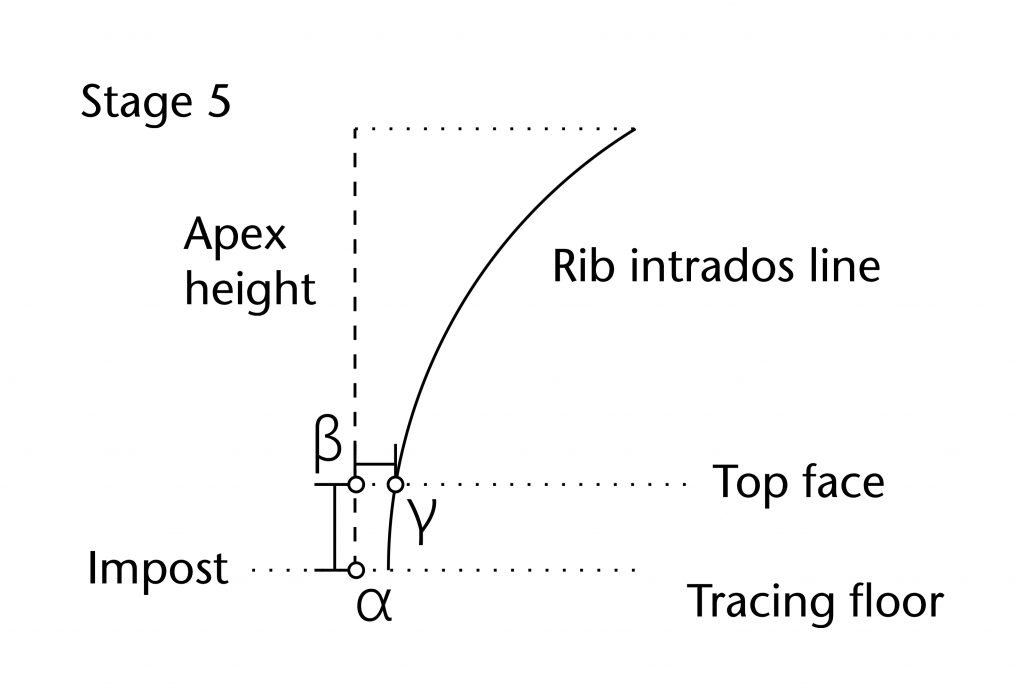


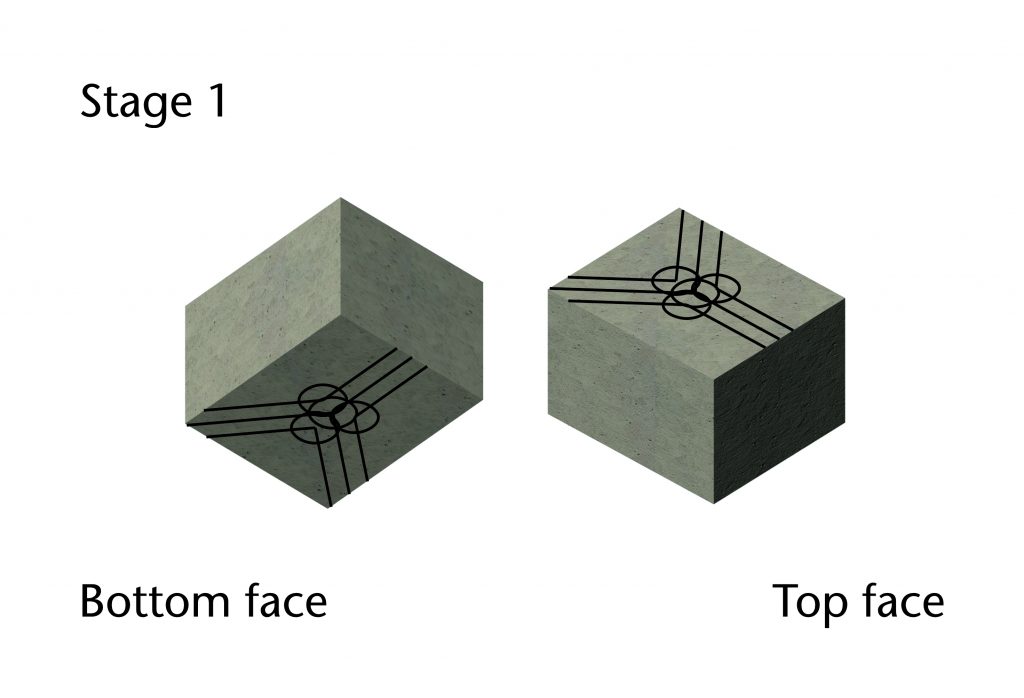
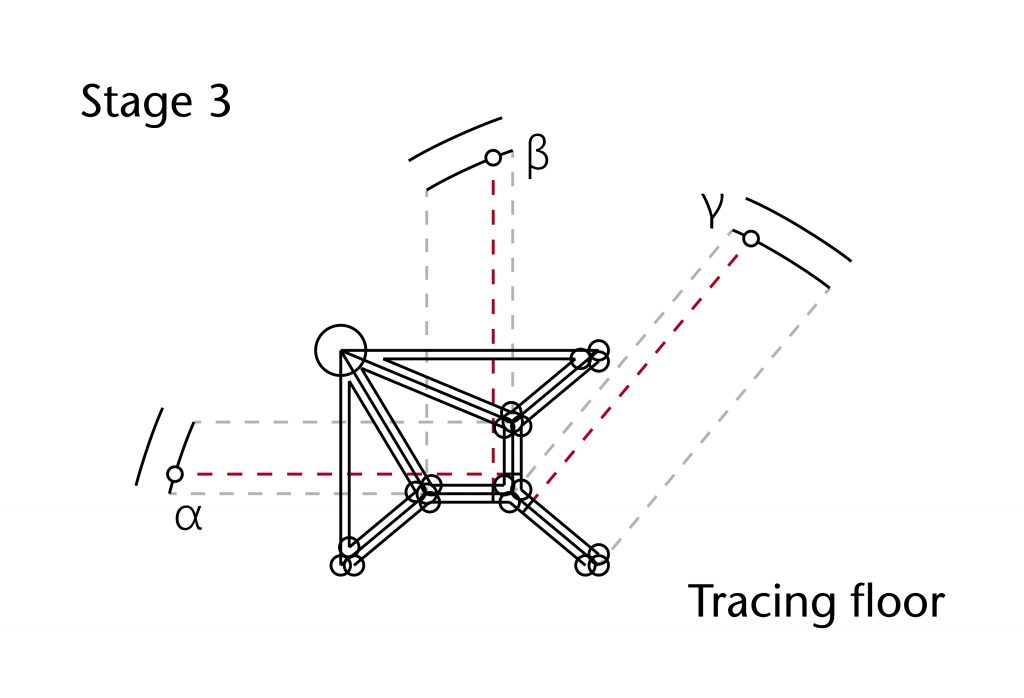
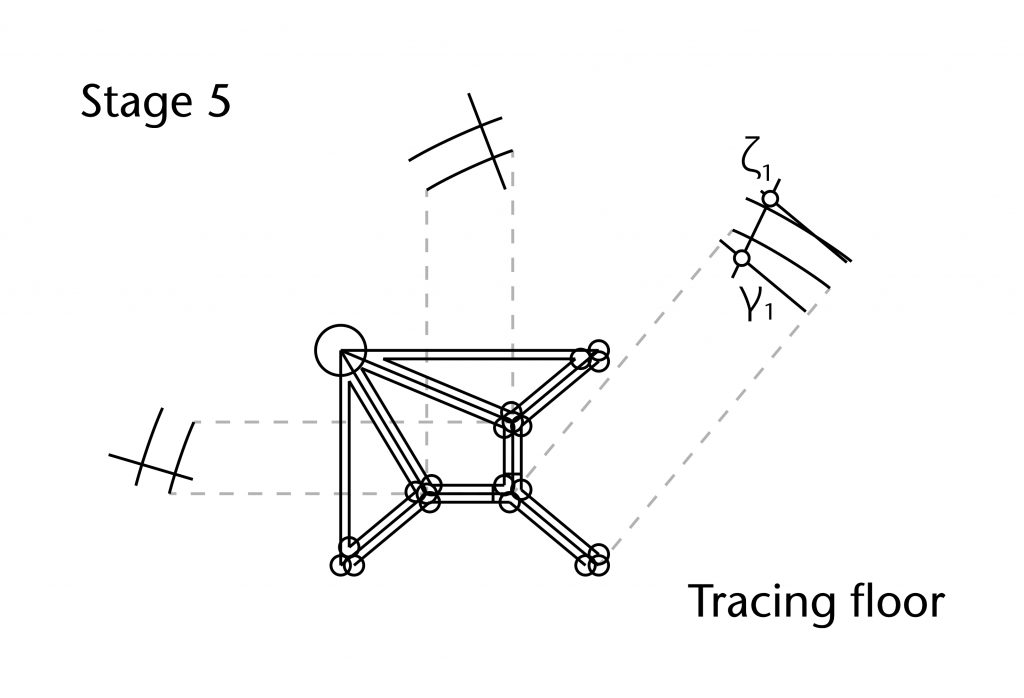
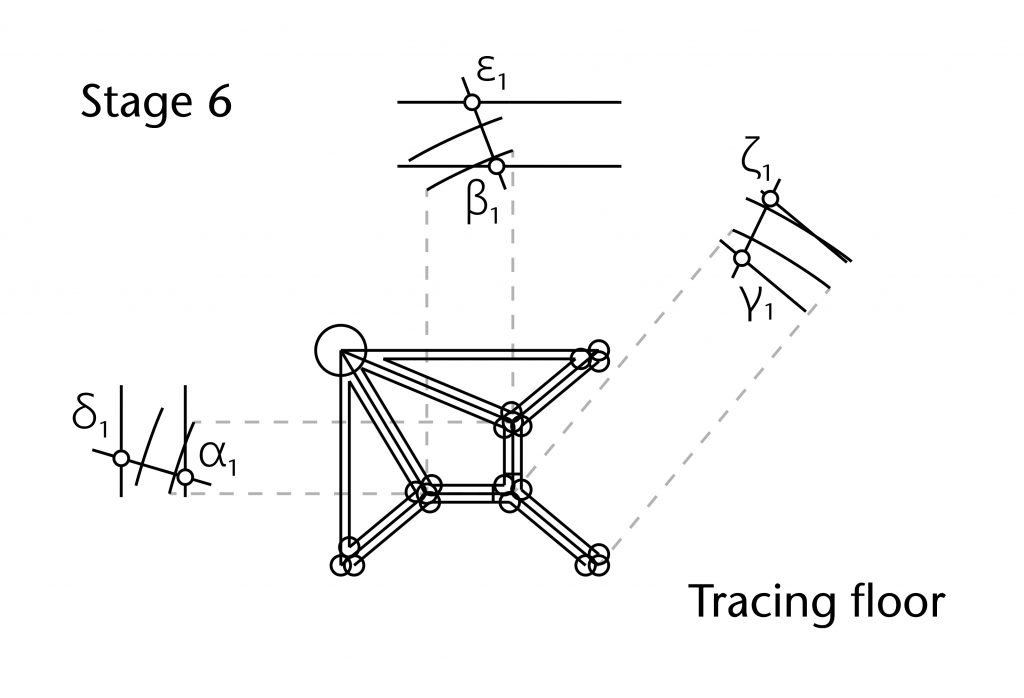
The geometry of the springing would be drawn out on the bottom face of the block, with the orientation, springing point and profile of each rib being defined. Vertical lines would then be used on the lateral faces to align the drawings on the top and bottom, allowing the angle of each rib to be set out on the top face. The position of the moulding profiles would then be defined by using a 1:1 scale drawing of the rib’s curvature, presumably on a tracing floor or some other flat surface. With the start and end point for each rib defined, a bevel could then be used to help cut the curvature between them. The mouldings would then be roughed out and the fine details carved in, resulting in a single block containing the curvatures and mouldings of all the intersecting ribs.
With the upper block, the setting out process was further complicated by the inclusion of the radial cuts, which would have represented a major challenge to the stonecutting skills of the masons. Firstly, the layout of the top surface for the lower block would need to be transferred onto the bottom surface of the upper block. Vertical lines would once again be used to align the geometry of the top and bottom faces and the angles of the ribs replicated on the top. The masons would then need to return to their 1:1 scale drawing to define the start and end points for the ribs. This geometry was then transferred onto the top face of the block and a bevel used to help cut the rib curvatures. The end point for each of the radial cuts would be defined using geometry and the bevel used to give their angle, resulting in a series of slanted surfaces on which the moulding profiles could be drawn. These were then roughed out and dressed in the same manner as the lower block.

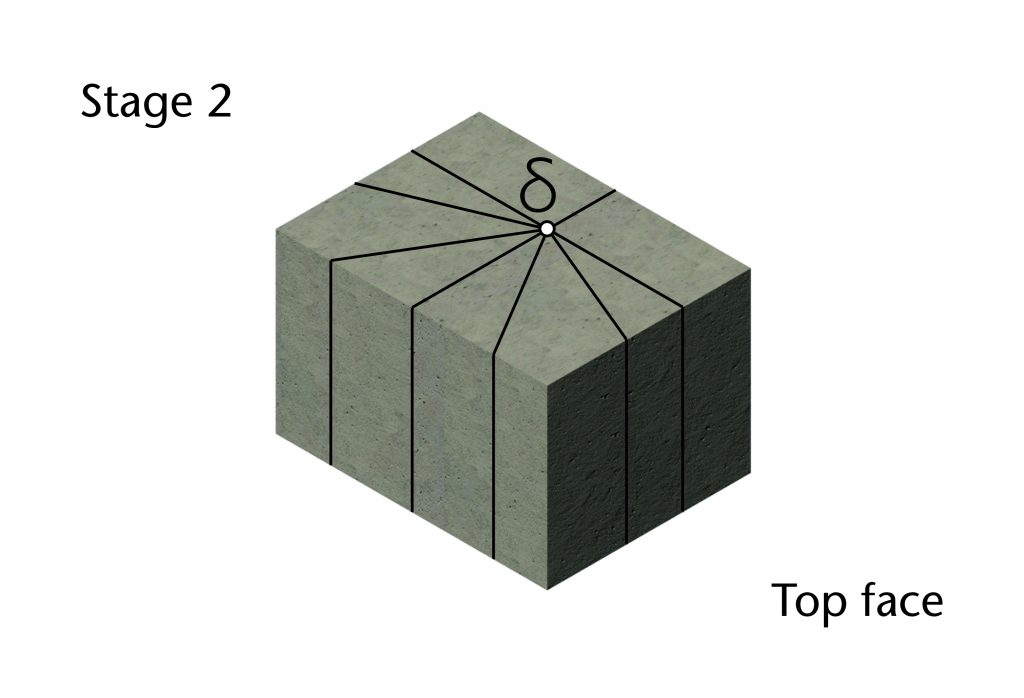

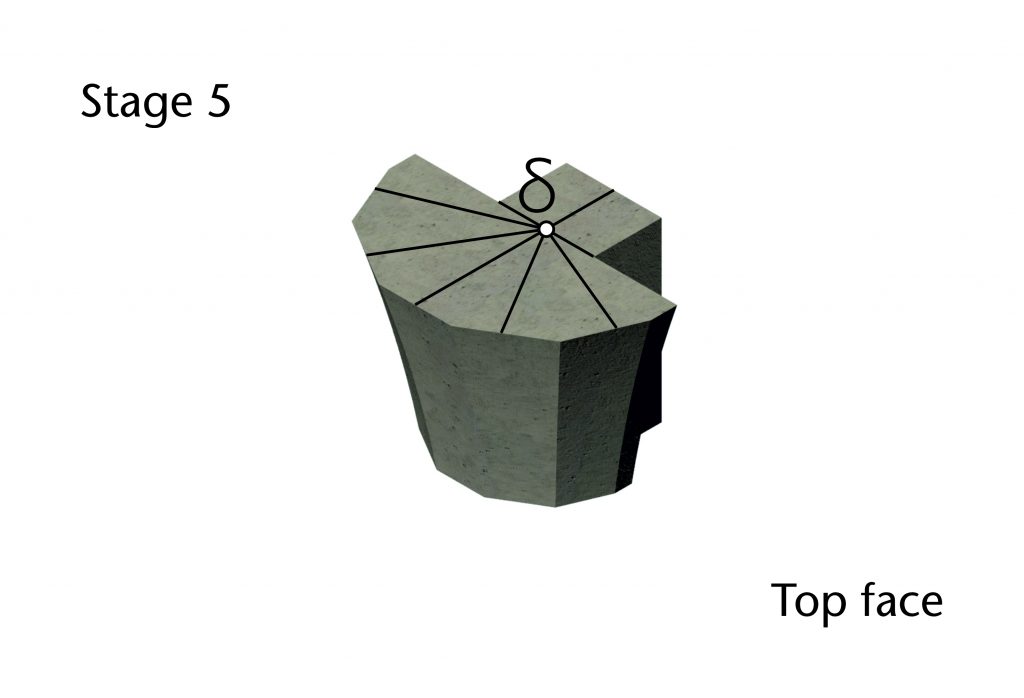

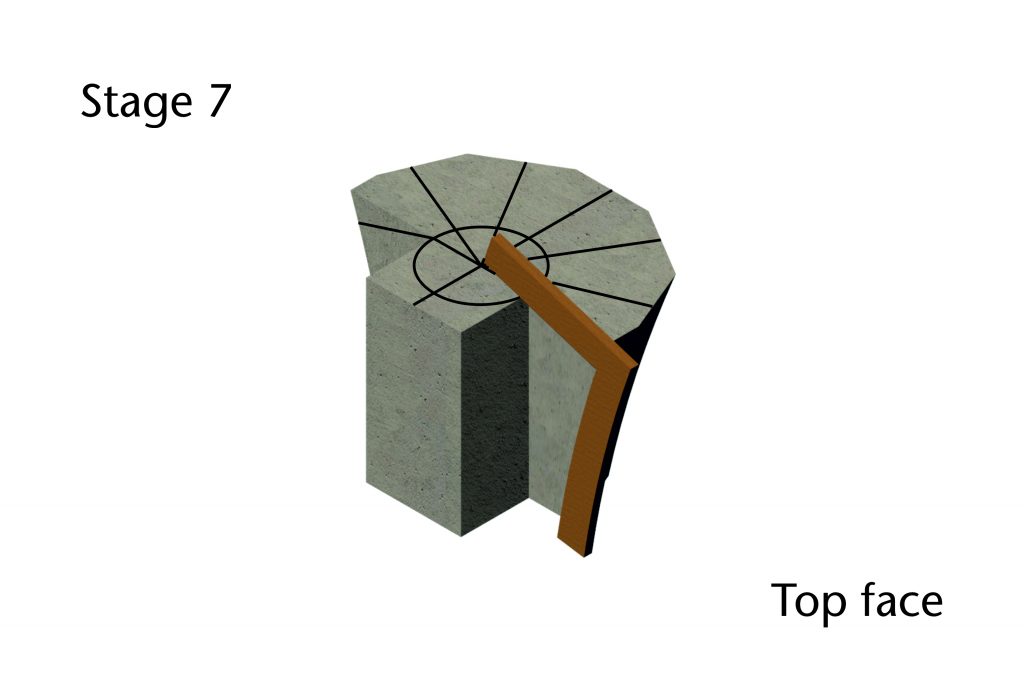
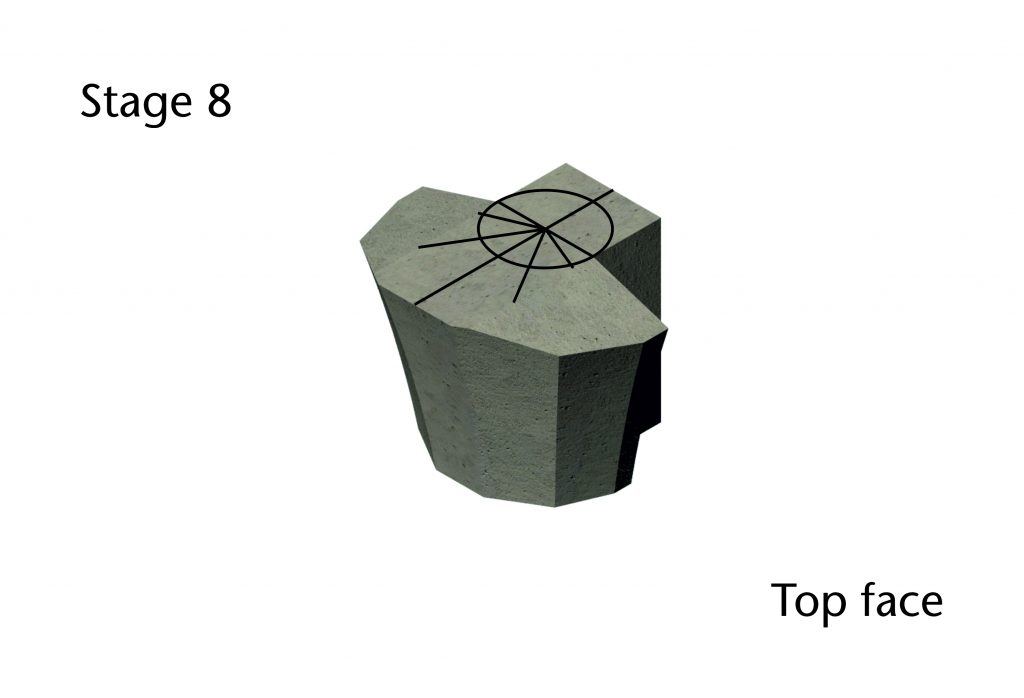
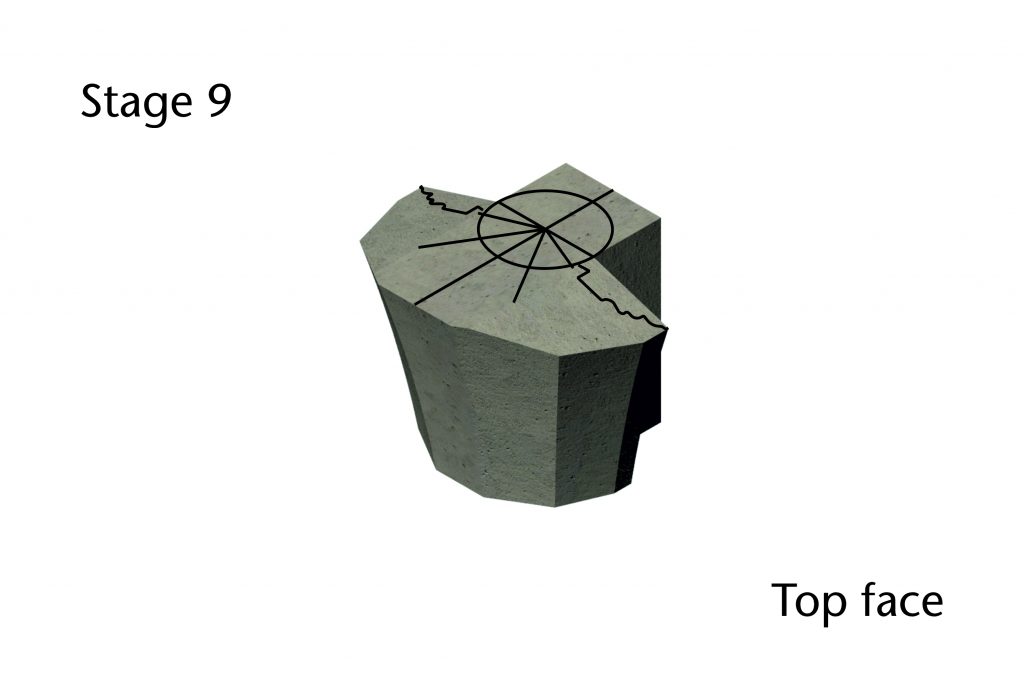
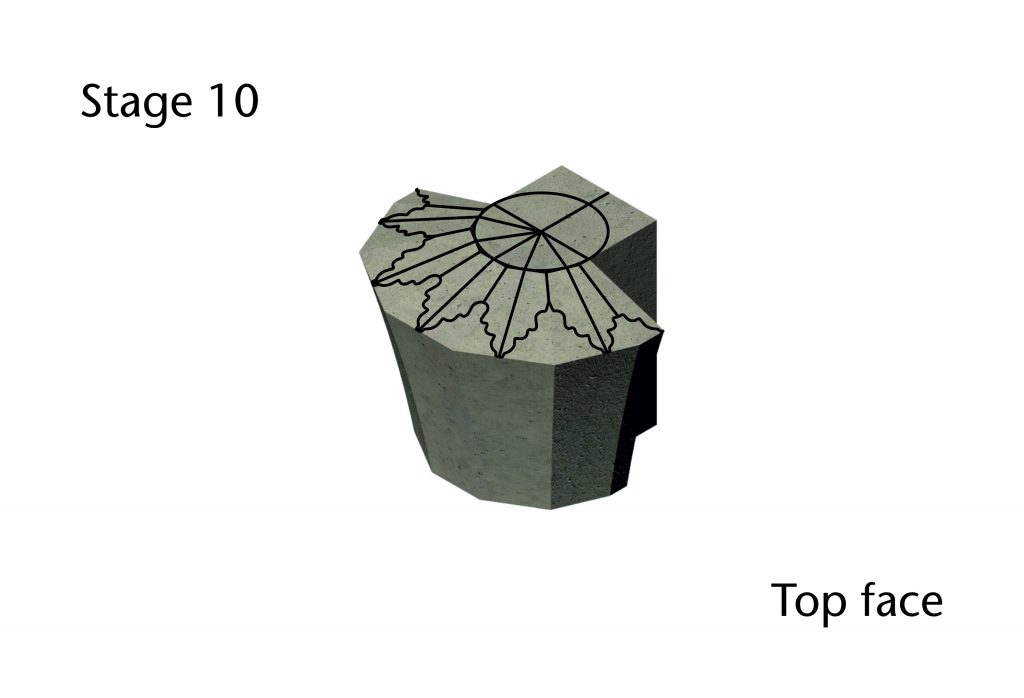
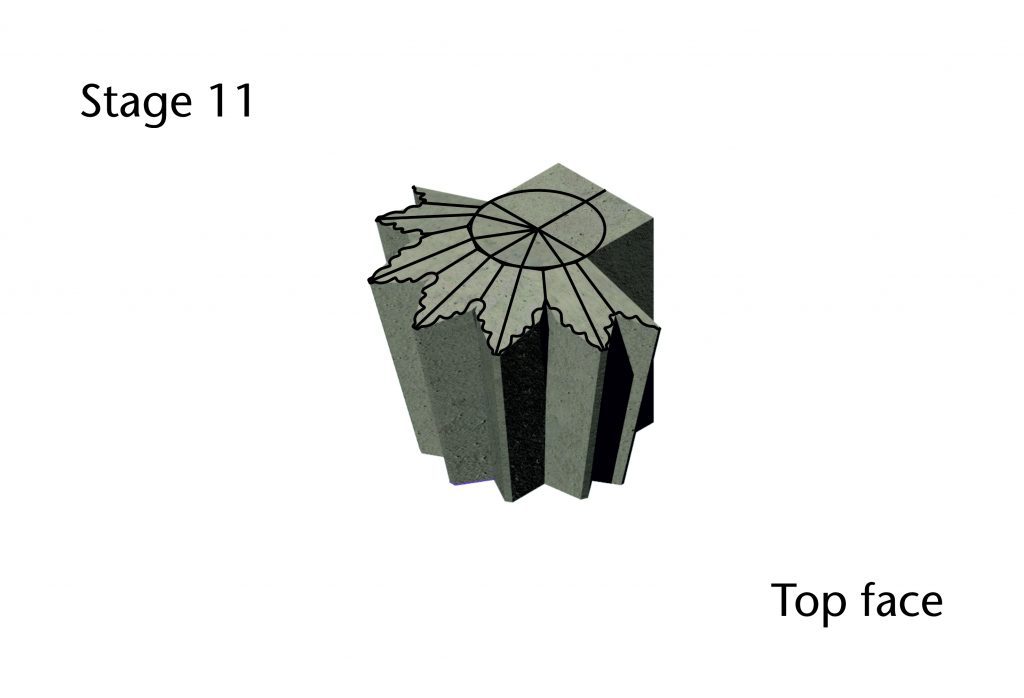
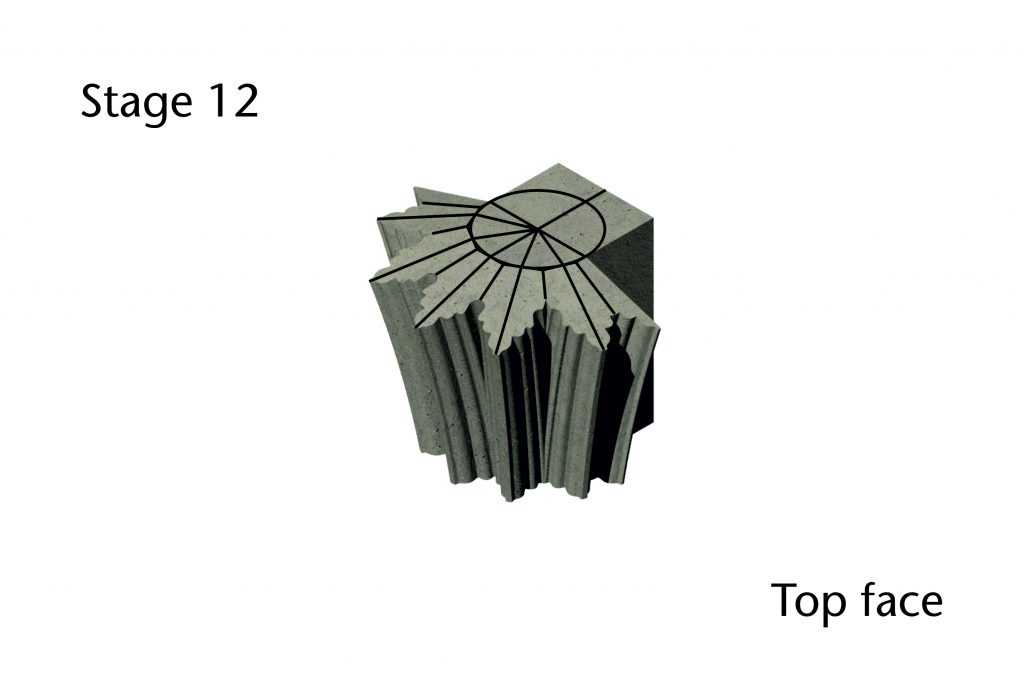
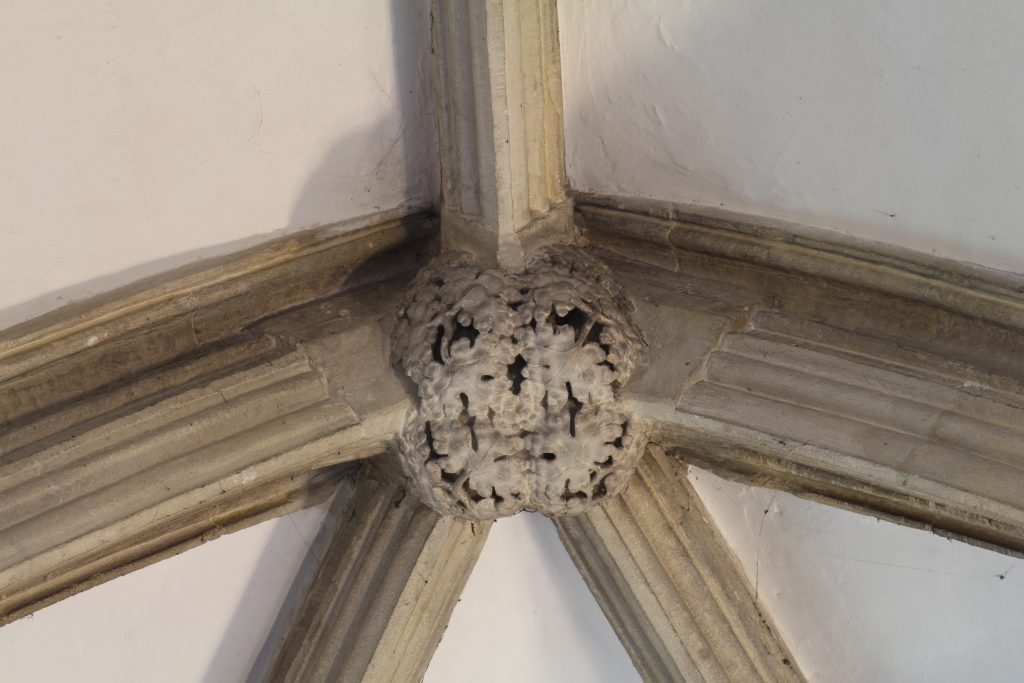
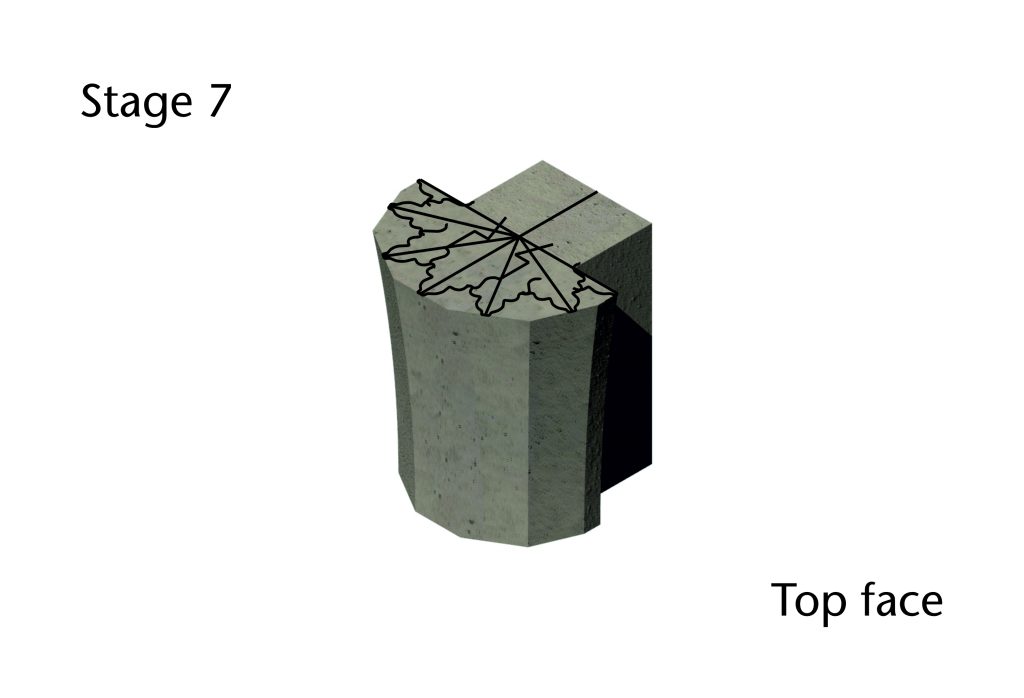
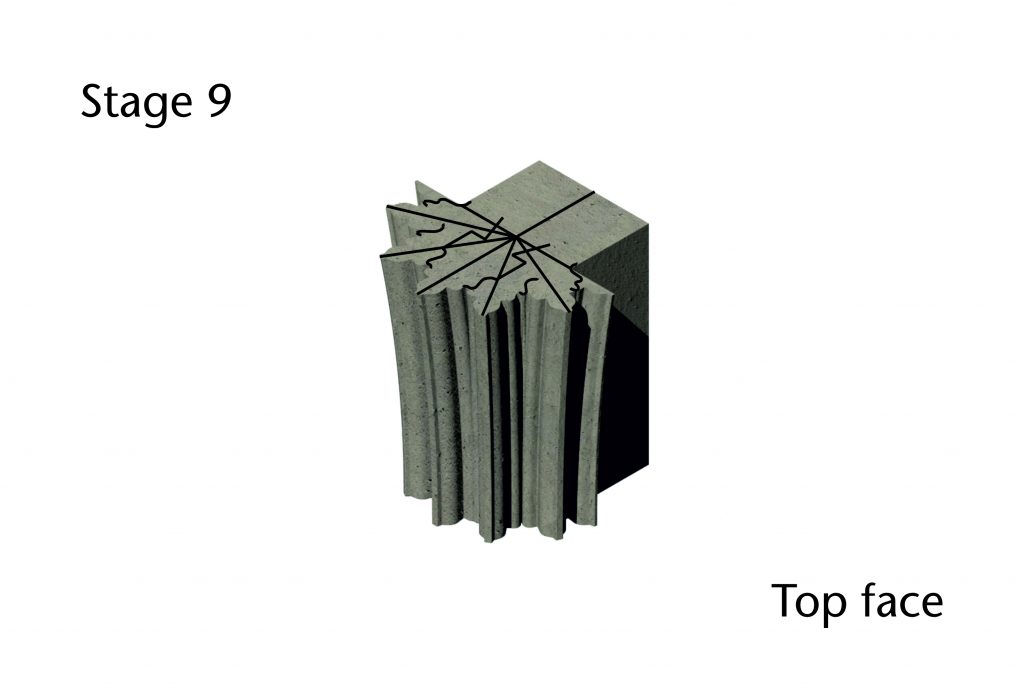
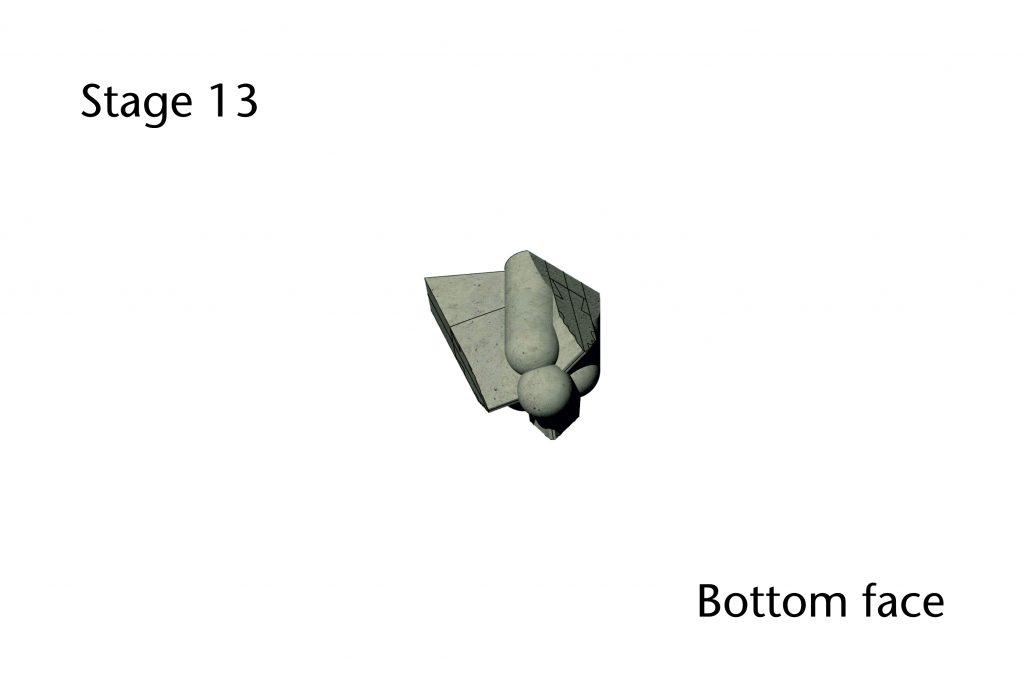
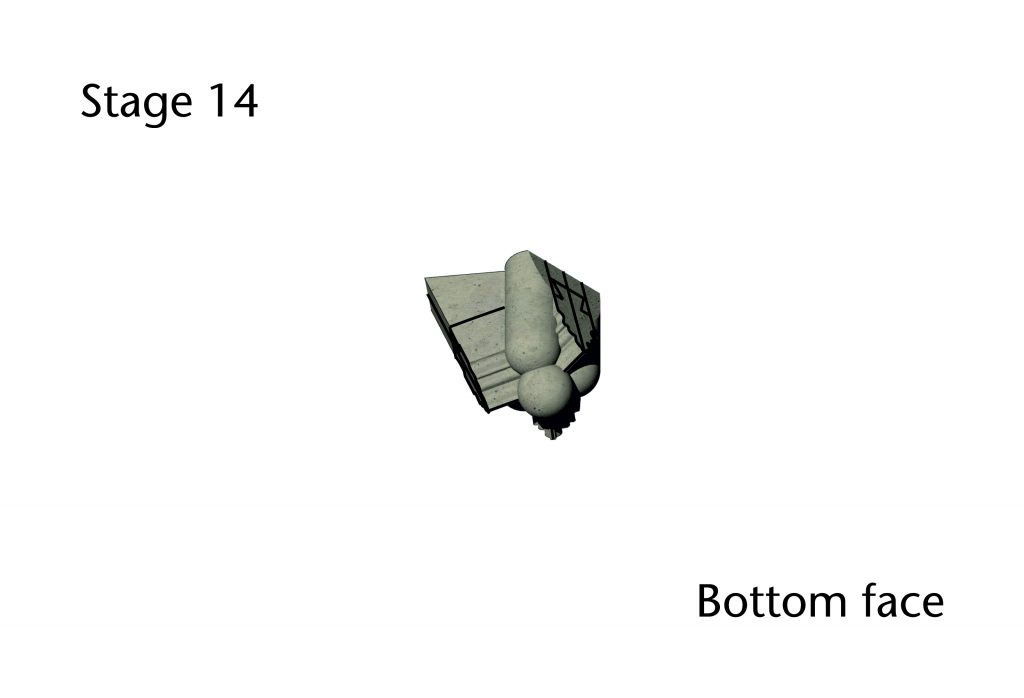
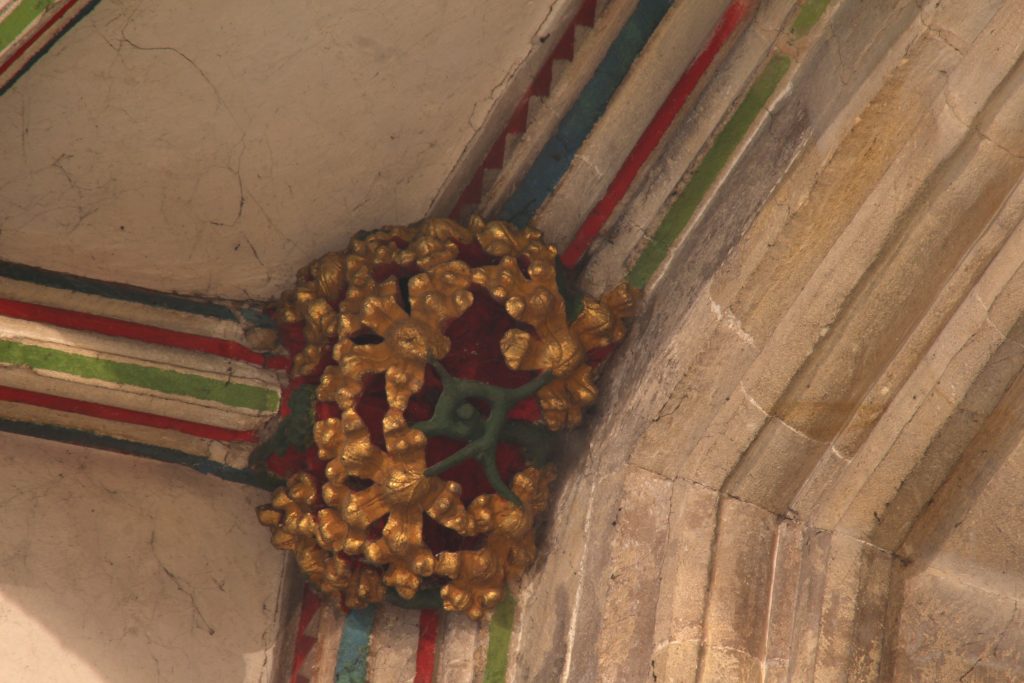
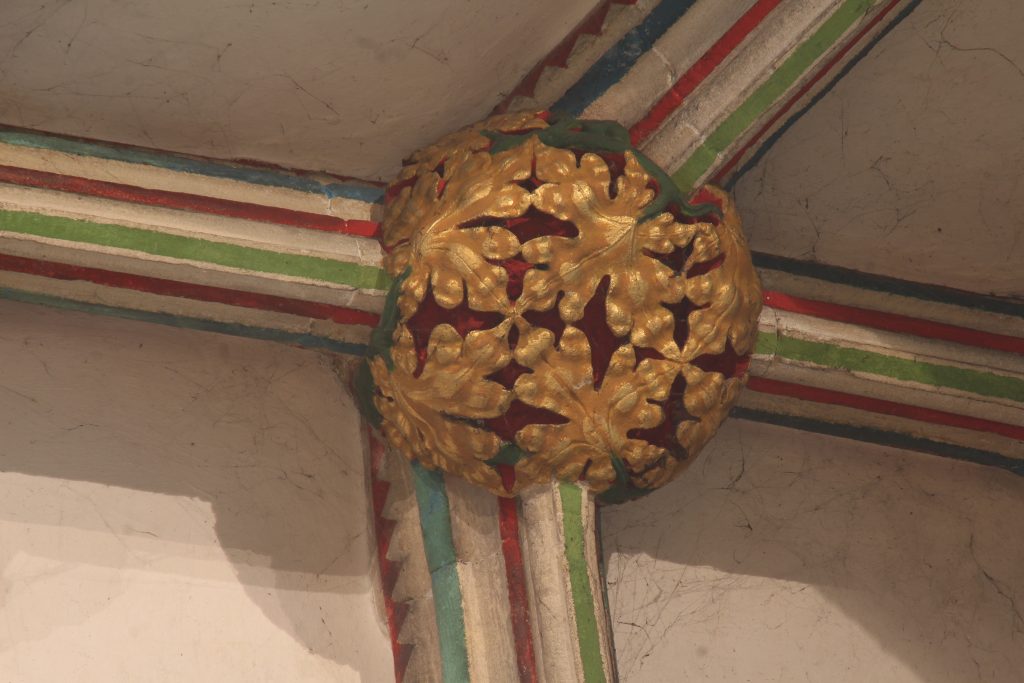
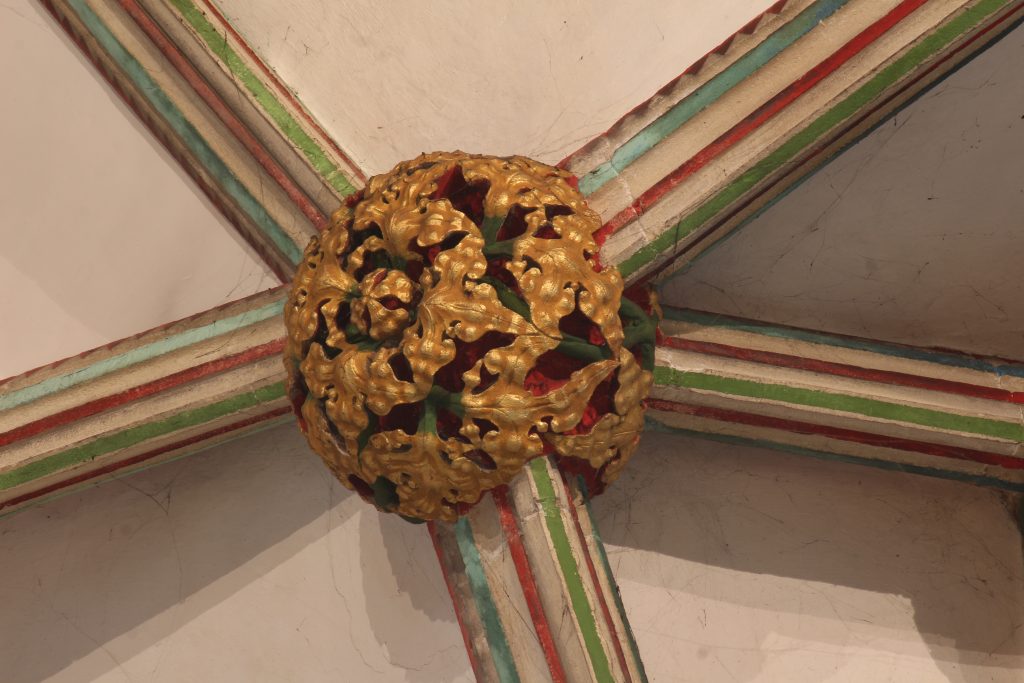
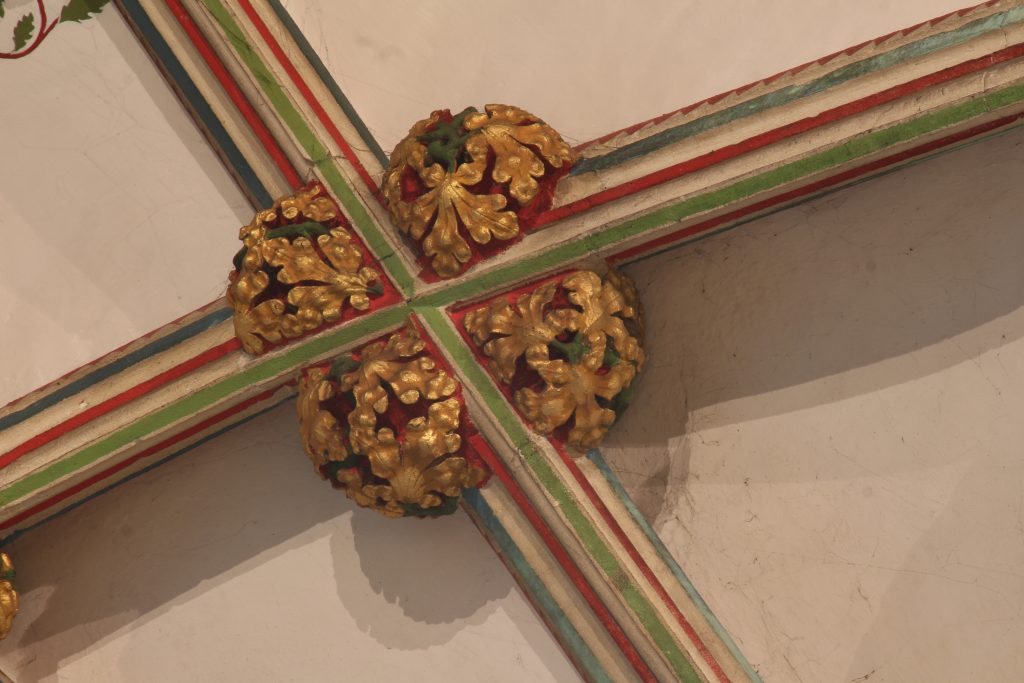
Bosses
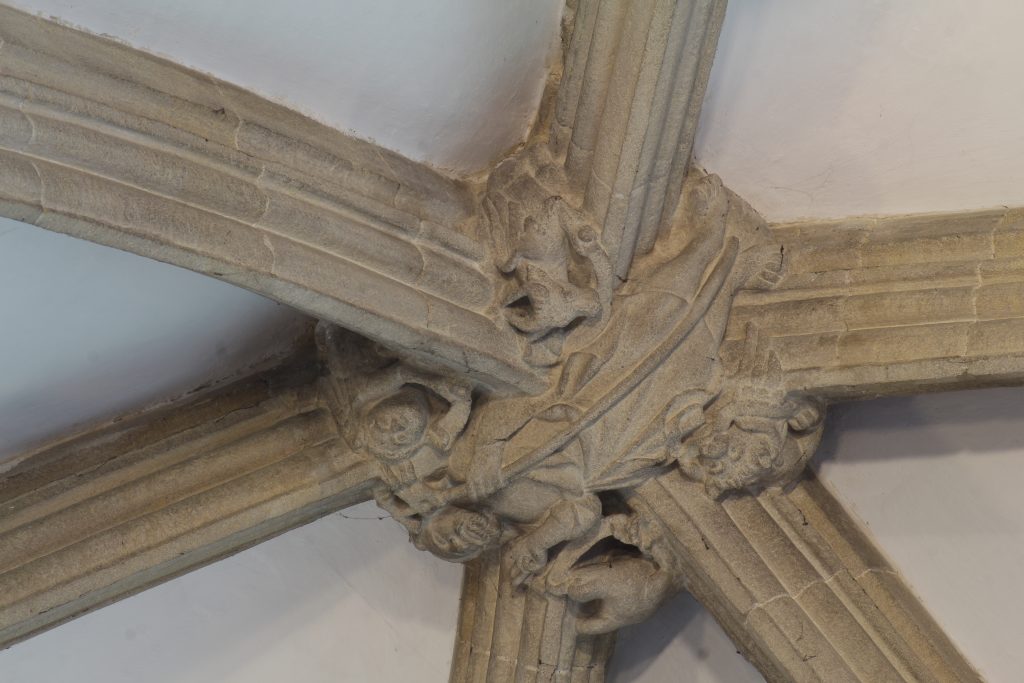
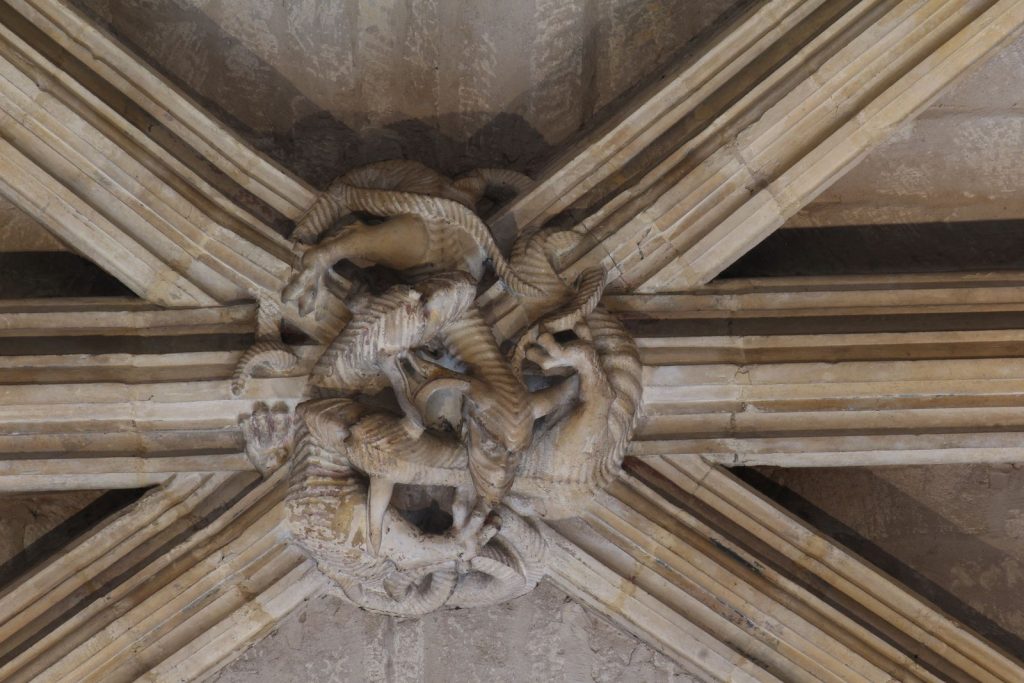
Bosses are by far the most challenging parts of the vault from a stonecutting perspective. This is because they represent the meeting point of two or more ribs at the same notional point, bringing multiple distinct curvatures together into a single, densely sculpted stone block. The starting point would be to set out the angles and positions of each rib on the top and bottom faces of the block. Once these were in place, it would then be necessary to work out the positions and angles of the cuts to be made. As in the case of the tas-de-charge, this was probably done at a 1:1 scale on a tracing floor or a similar drawing surface. The plan and curvature of the ribs would be used in conjunction with a bevel to define the start and end points for the rib joints, after which the block height would be used to find the positions of the necessary cuts. These would then be drawn onto the block faces and the rough carving would begin, focusing on defining the angles of the joints. Once this was completed, the moulding profiles could be drawn in and the excess stone cut away stage by stage. Lastly the fine carving of the mouldings would be completed and the sculptural work begun.


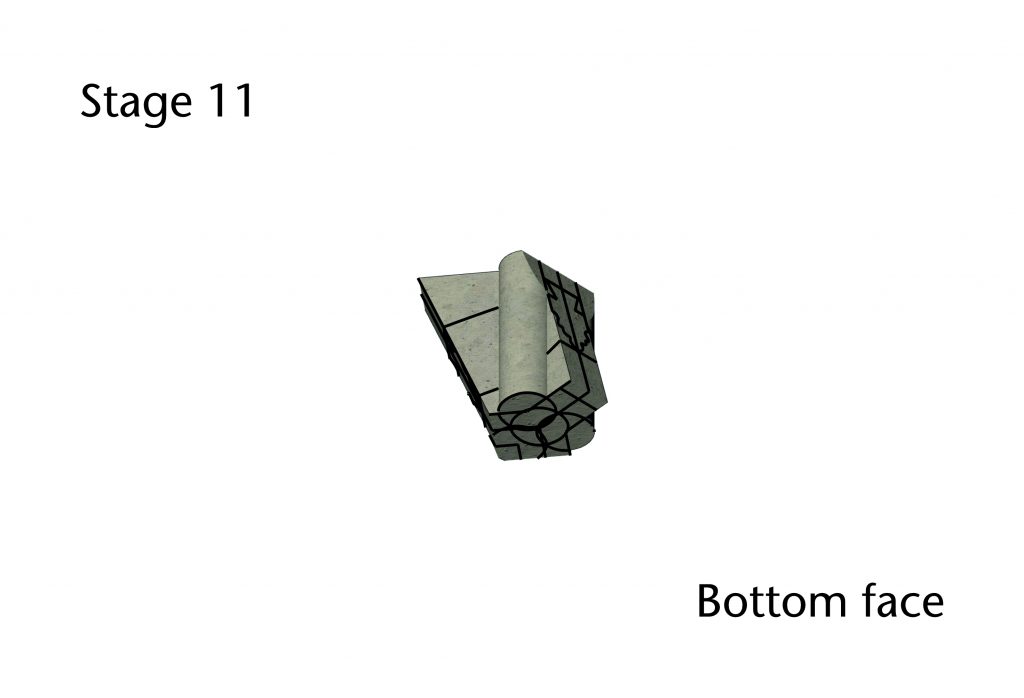
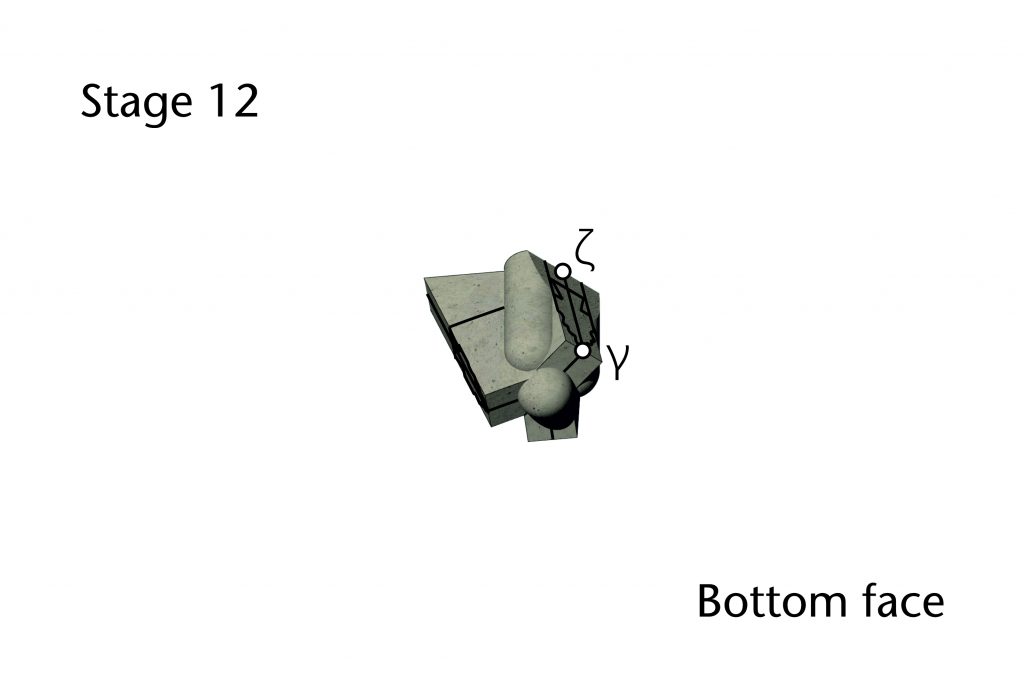
The methods outlined above demonstrate that drawing using geometry was not simply a design tool for medieval masons, but an integral part of the stonecutting process. Incised drawings were essential not just for working out the plan and curvatures of the ribs at full scale, but also the detailed layout of the individual blocks. The processes through which this was accomplished are not entirely clear. Surviving tracing floors were often placed in high, inaccessible locations with low ceilings, meaning that it would have been difficult for stones to be cut nearby. Some form of template for transferring the geometry is possible, but it would be difficult to construct one which was applicable to any situation, especially when the size of the stone block was variable. Whatever the case, even the simplest of bosses was the result of a remarkable combination of geometrical knowledge and practical skill without which a vault could not have been constructed.
Sculpture

Once the architectural features of the ribs had been completed, the masons could move on to carving their sculptural elements. Throughout the stonecutting process, any parts of the block which were intended for sculpture were left as a blank nubbin. These smooth, round protrusions provided a clearly delimited area within which the sculptural details could be carved, whether by following a repeated pattern of foliate forms or in devising an elaborate figurative scene for a sculpted boss.
Whilst there were many masons capable of carving both architectural elements and sculpture, the latter did require an expanded skillset which was often practised by specialists. Sculpture was in a sense the stonecutting equivalent of freehand lines in medieval design drawings. Whereas the architectural elements of the block were reliant on the geometrical ordering of forms, sculptors could employ a more intuitive approach to realising their designs. Some kind of outline for the composition would probably be drawn out on the surface, providing a set of guidelines for cutting away the excess stone. However, the fine carving would not be defined in such linear terms, relying instead on the practical skill of the mason to develop its shape.
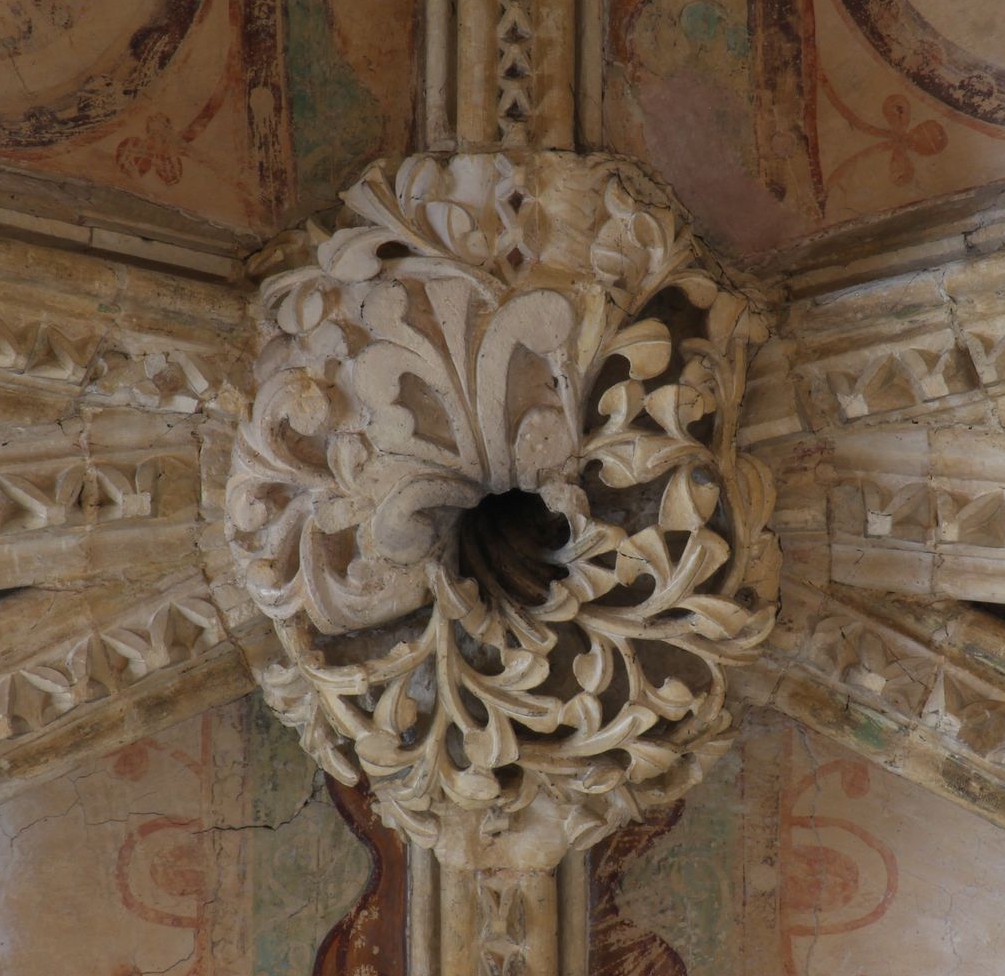
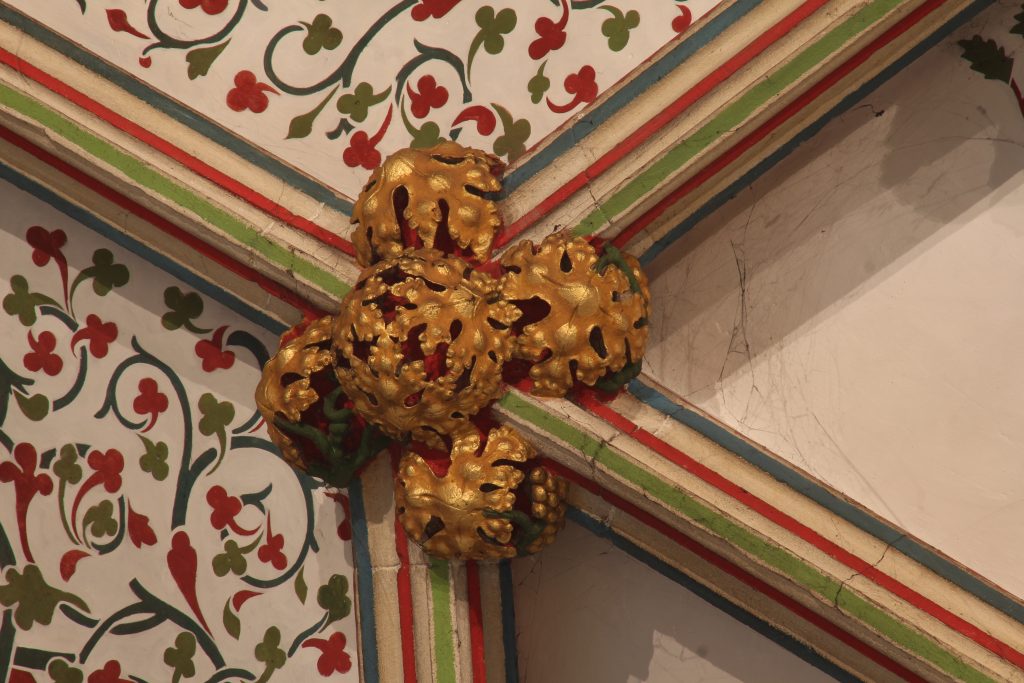
Bosses in particular offered remarkable opportunities for sculptors to exercise their creative prowess. Foliage was the standard form of decoration, but its form could vary considerably from vault to vault. At Wells the bosses were mostly decorated using conventional, stylised foliate forms, but in many of the vaults at Lincoln highly naturalistic foliage appears.
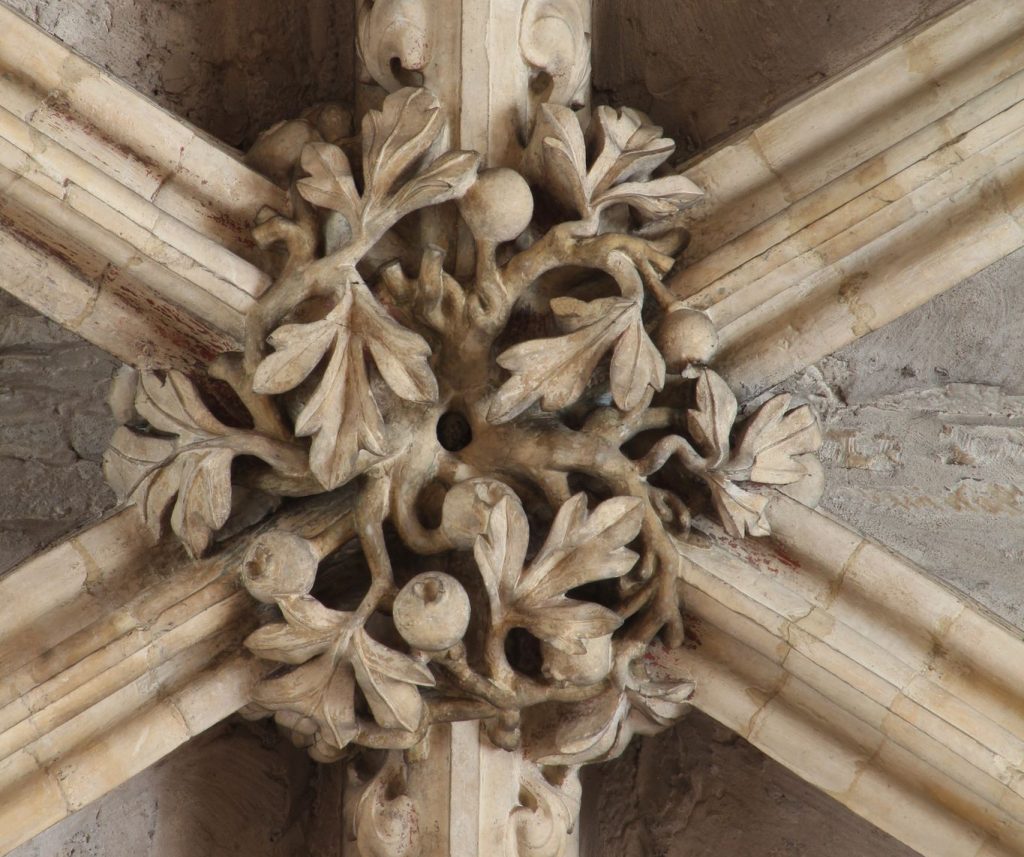
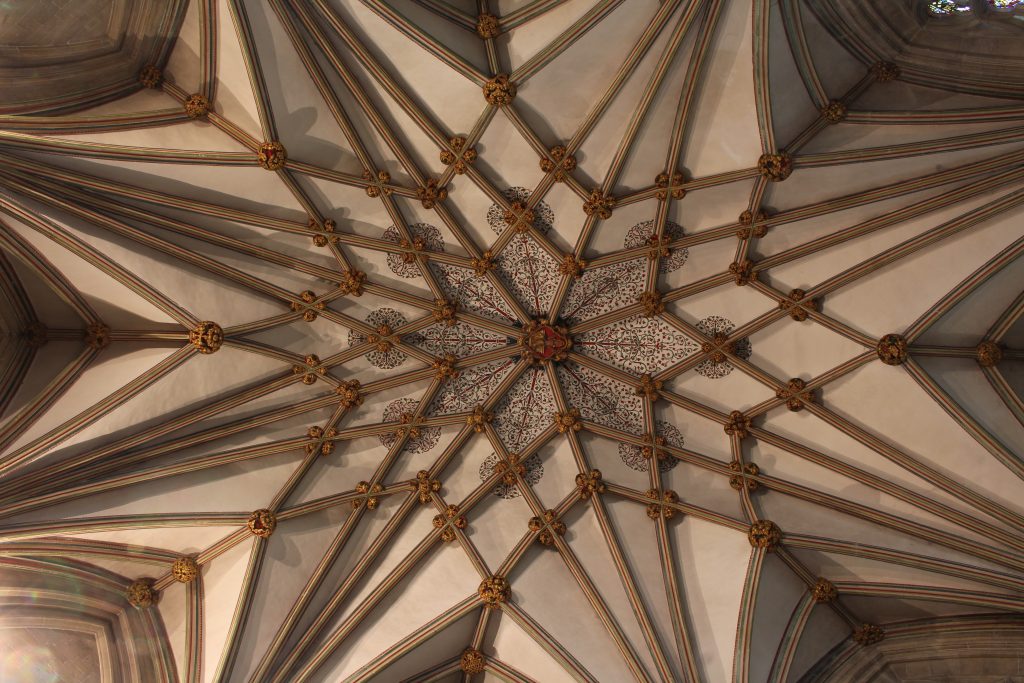
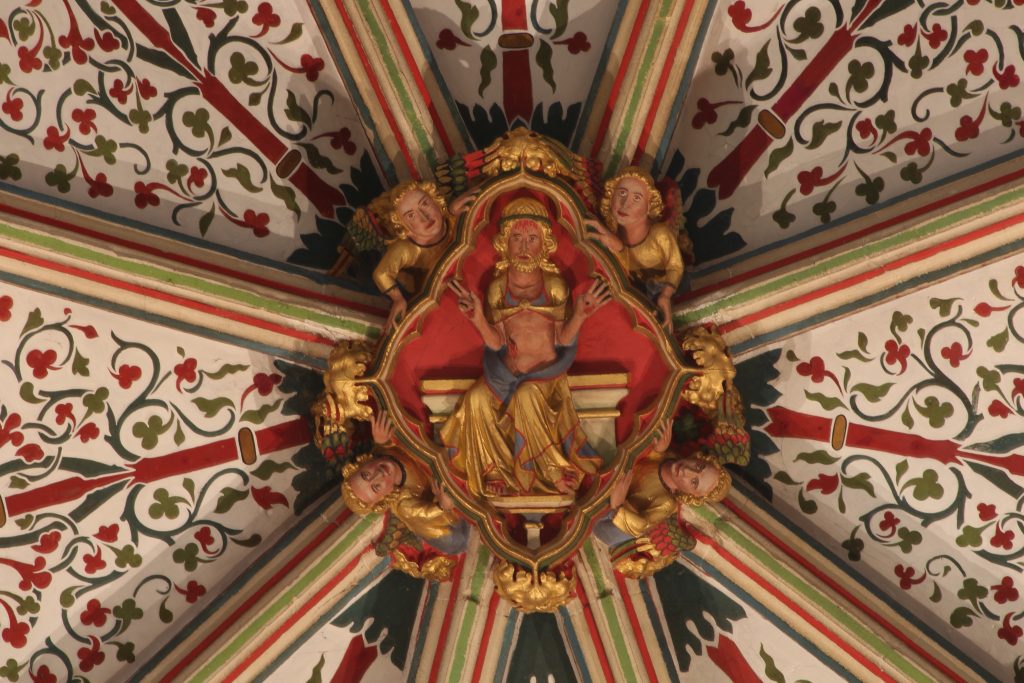
Sometimes the design of the bosses was used to articulate the structure of the surrounding architecture. In the Lady Chapel at Wells Cathedral, many of the bosses are split into smaller foliate clusters, divided by the converging intrados lines of the ribs. The different designs are arranged in a hierarchical order. The wall ribs above the windows have simple half-bosses, the tiercerons of the adjoining tunnels are columnar masses of foliage and the intersections between the tunnels and the main vault are marked by great foliate balls. The central vessel of the vault is a crisscrossing pattern of tiercerons, splitting the bosses into smaller spherical fragments. At the apex of each tierceron, the centre of the boss is marked by an additional ball of foliage, acting as an emphatic end point to their curvature. Meanwhile, the crown of the vault is inhabited by an image of Christ in Judgment, showing his wounds with open arms and sitting in an ornate mandorla which echoes the asymmetrical shape of the ground plan below.
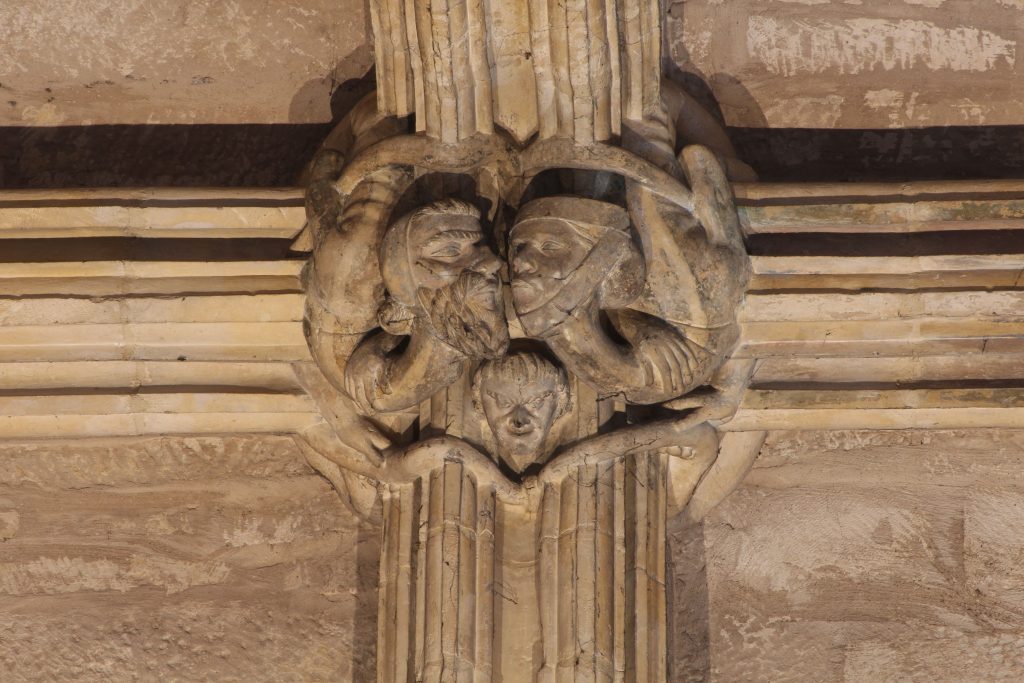
Other sculptors took advantage of the incoming ribs and the rounded shapes of the bosses to produce creative compositions, seemingly taking a delight in the complexity and difficulty of their works. In figurative bosses this could be expressed through remarkable perspectival effects. Figures bend and distort around the curved surface of the boss, enabling the sculptors to depict motion and show multiple narrative moments within a single composition. Other examples adopted a more playful approach to architectural forms, with interlaced monsters weaving their limbs and tails in and out of the mouldings of the ribs or clashing figures scrabbling for purchase on the undulating surface of the stone.

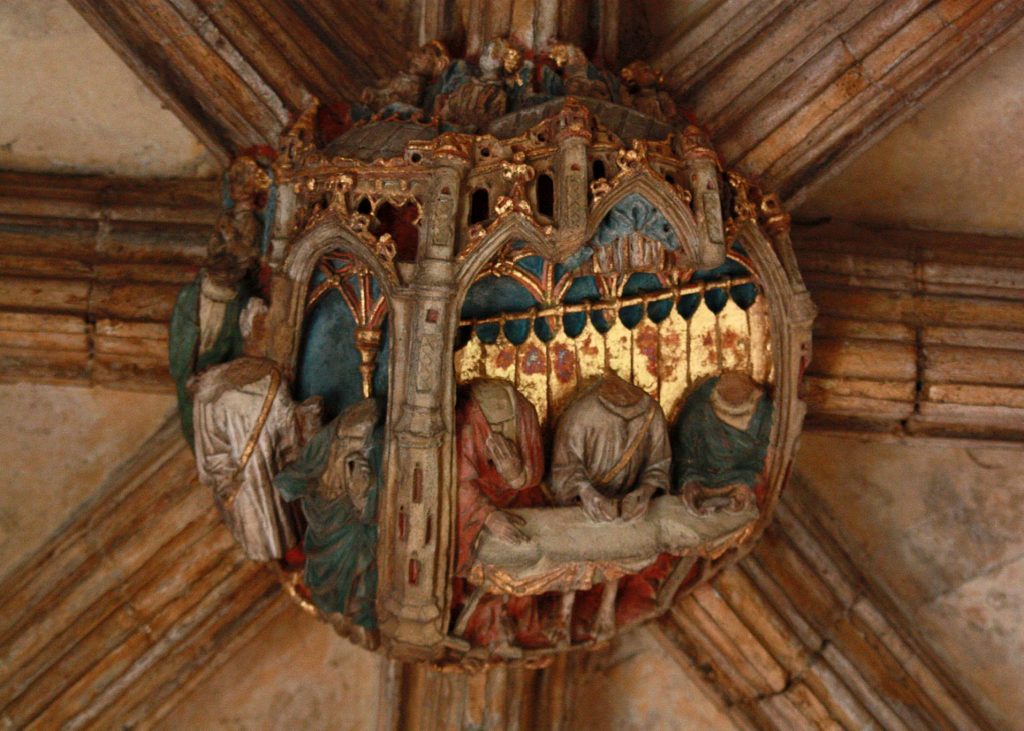
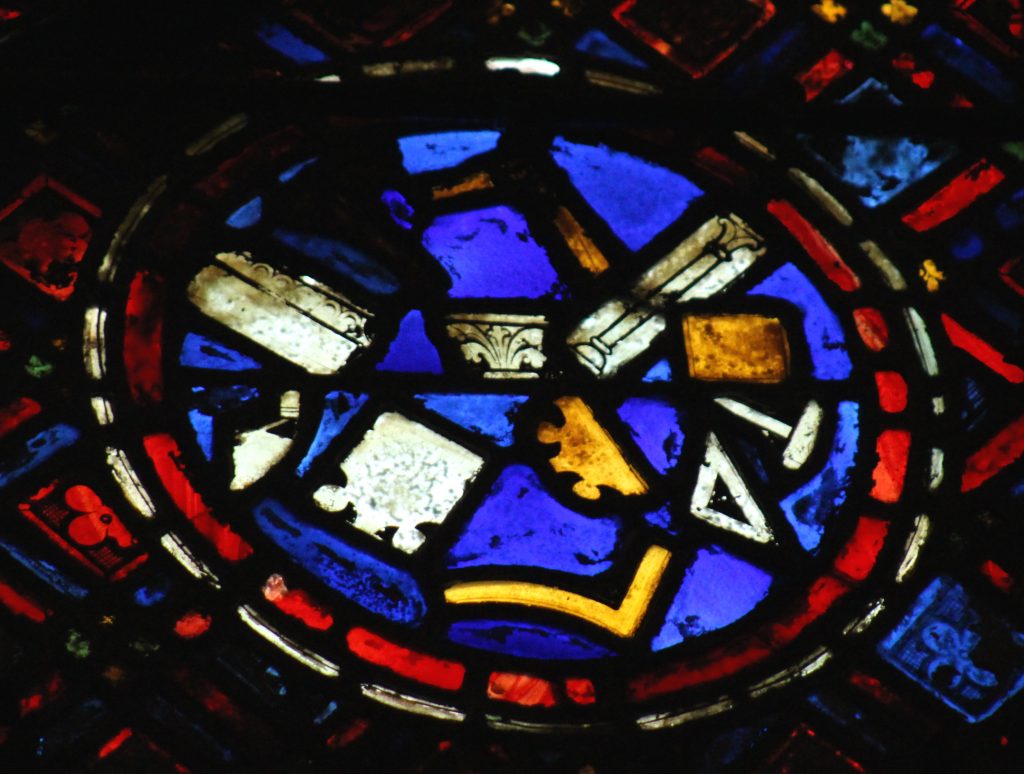
However, bosses were not the only aspect of medieval vaults which featured sculpture. Ribs could also be decorated with sculptural elements, whether in the form of tiny budding flowers, long lines of dogtooth ornament or scrolling vine-like foliage. These were conventionally tucked away in hollows and crannies and were sometimes so small that they were difficult to see from the ground. Sculptures were also often painted, greatly improving their visibility and converting the vault into a polychrome composition of bright reds, deep blues, vivid flesh tones and glittering gold.
Further reading
- Buchanan, A., Hillson, J. and Webb, N. (2021). Digital Analysis of Vaults in English Medieval Architecture. New York and London: Routledge.
- Ibarra Sevilla, B. (2012) El Arte de la Canteria Mixteca. Mixtec Stonecutting Artistry. Mexico: Universidad National Automoma de Mexico.
- Willis, R. (1842) ‘On the Construction of the Vaults of the Middle Ages’, Transactions of the Royal Institute of British Architects 1(2), pp. 1-69.

3 Comments
[…] Find out more about the role of drawing in medieval stonecutting. […]
[…] Find out more about cutting voussoirs, tas-de-charges and bosses Find out more about the materials used in medieval vaulting […]
[…] Find out more about medieval stonecutting techniques and how they were used to make ribs and bosses […]